Introduction
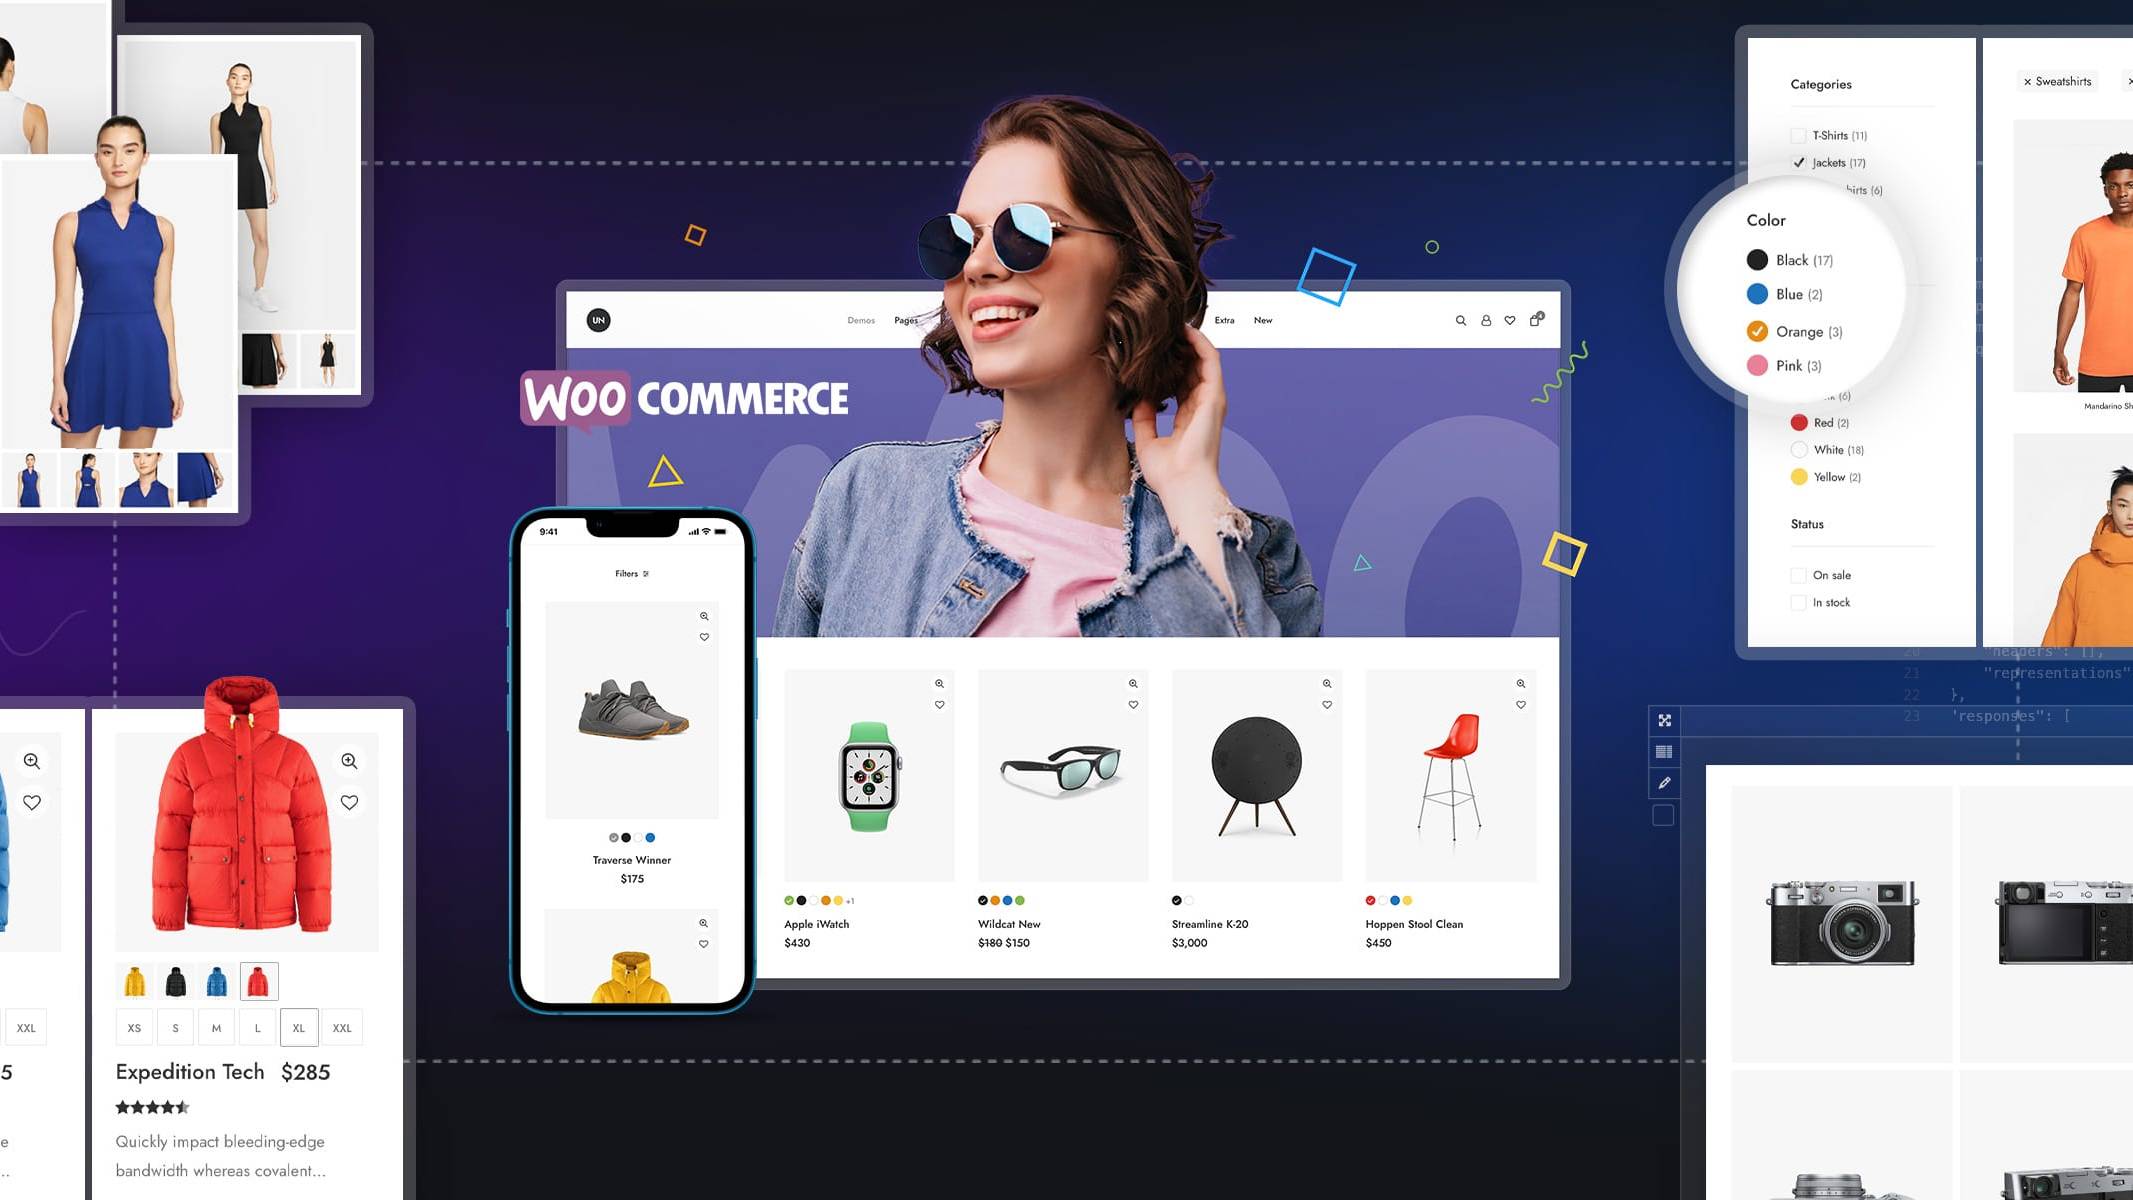
We are thrilled to announce the release of Uncode 2.7.0, the latest evolutionary update of Uncode. The new update focuses on spectacular WooCommerce features, which make Uncode one of the most advanced themes for building online stores, giving you the confidence to take any professional-quality WooCommerce project head-on.
Variation Swatches
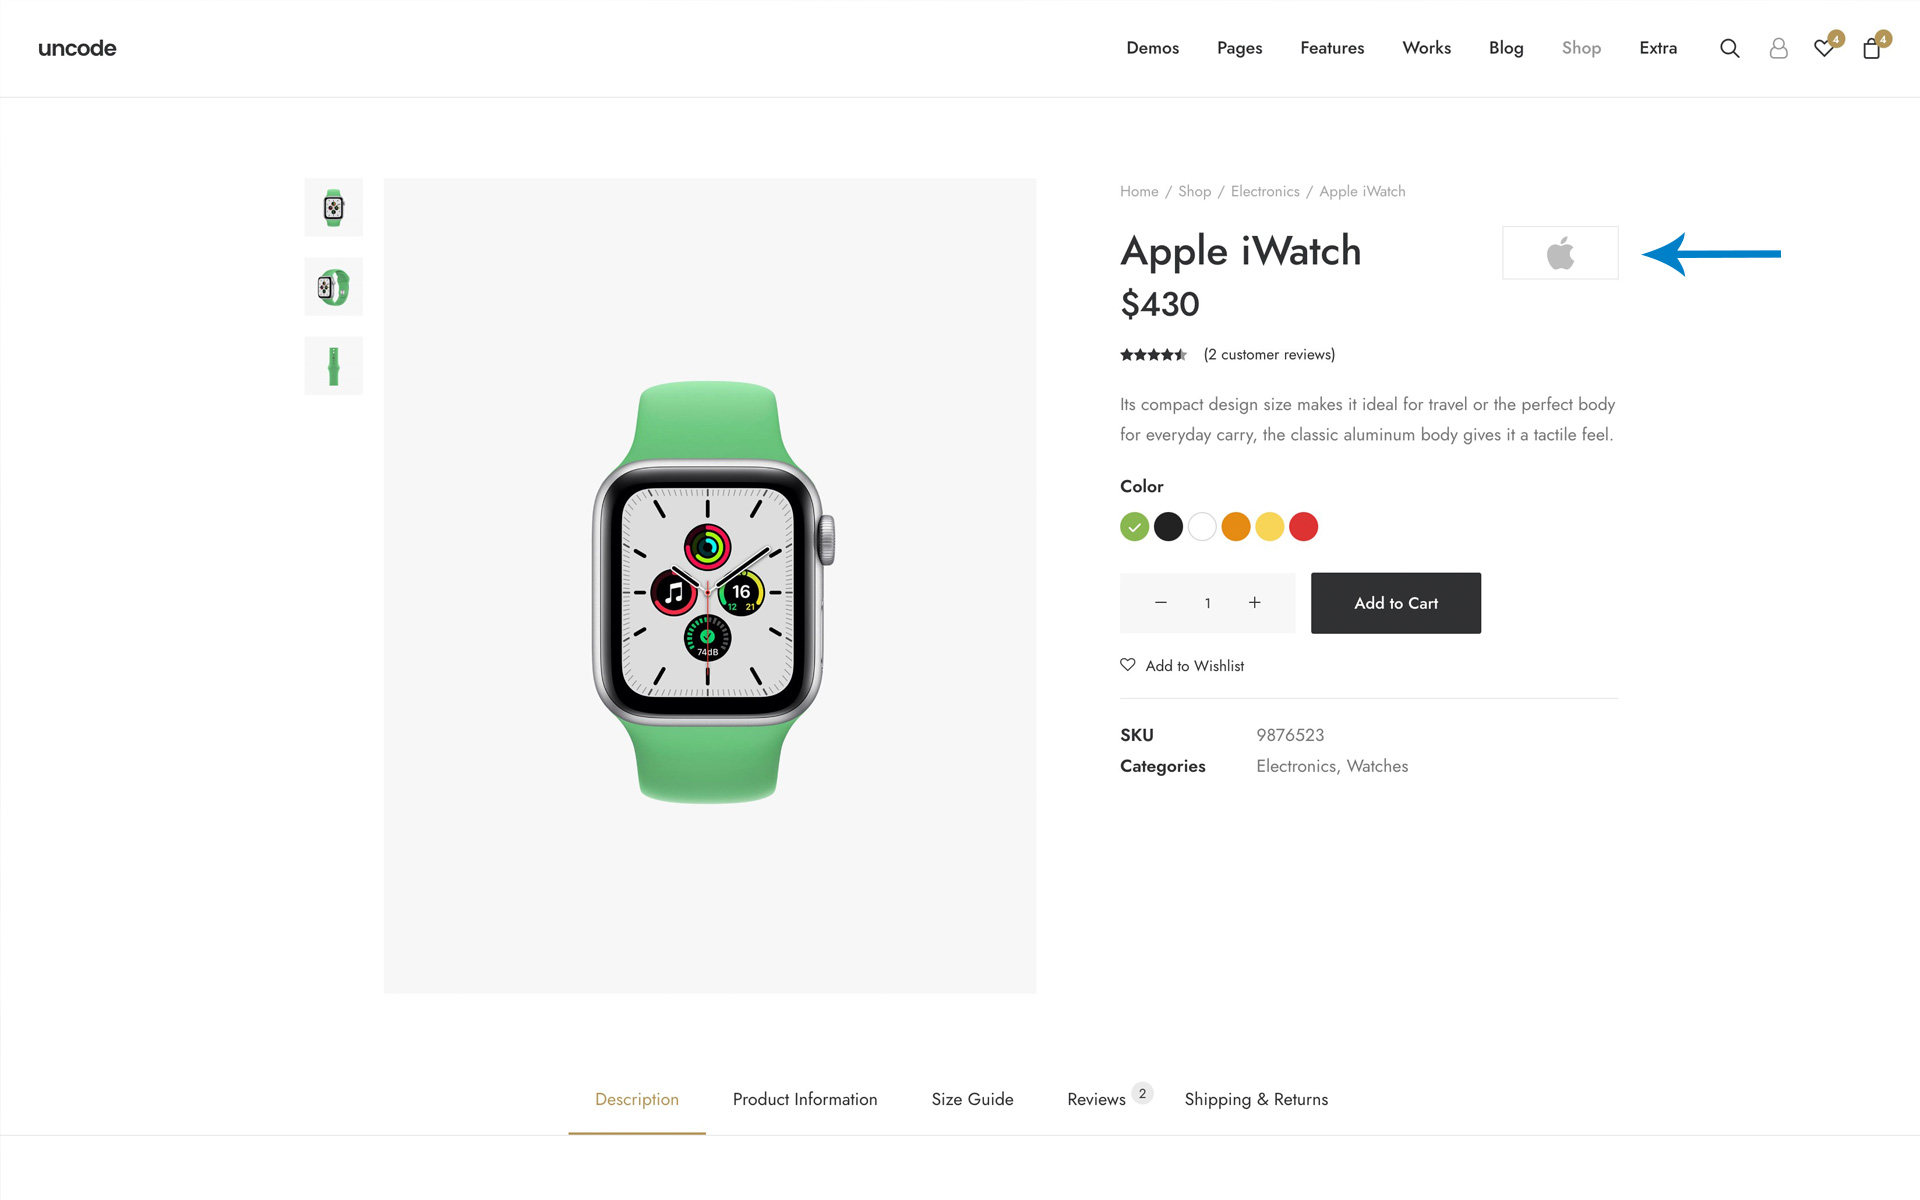
From Uncode 2.7.0, Uncode users can benefit from advanced Variation Swatches options without buying extra paid plugins.
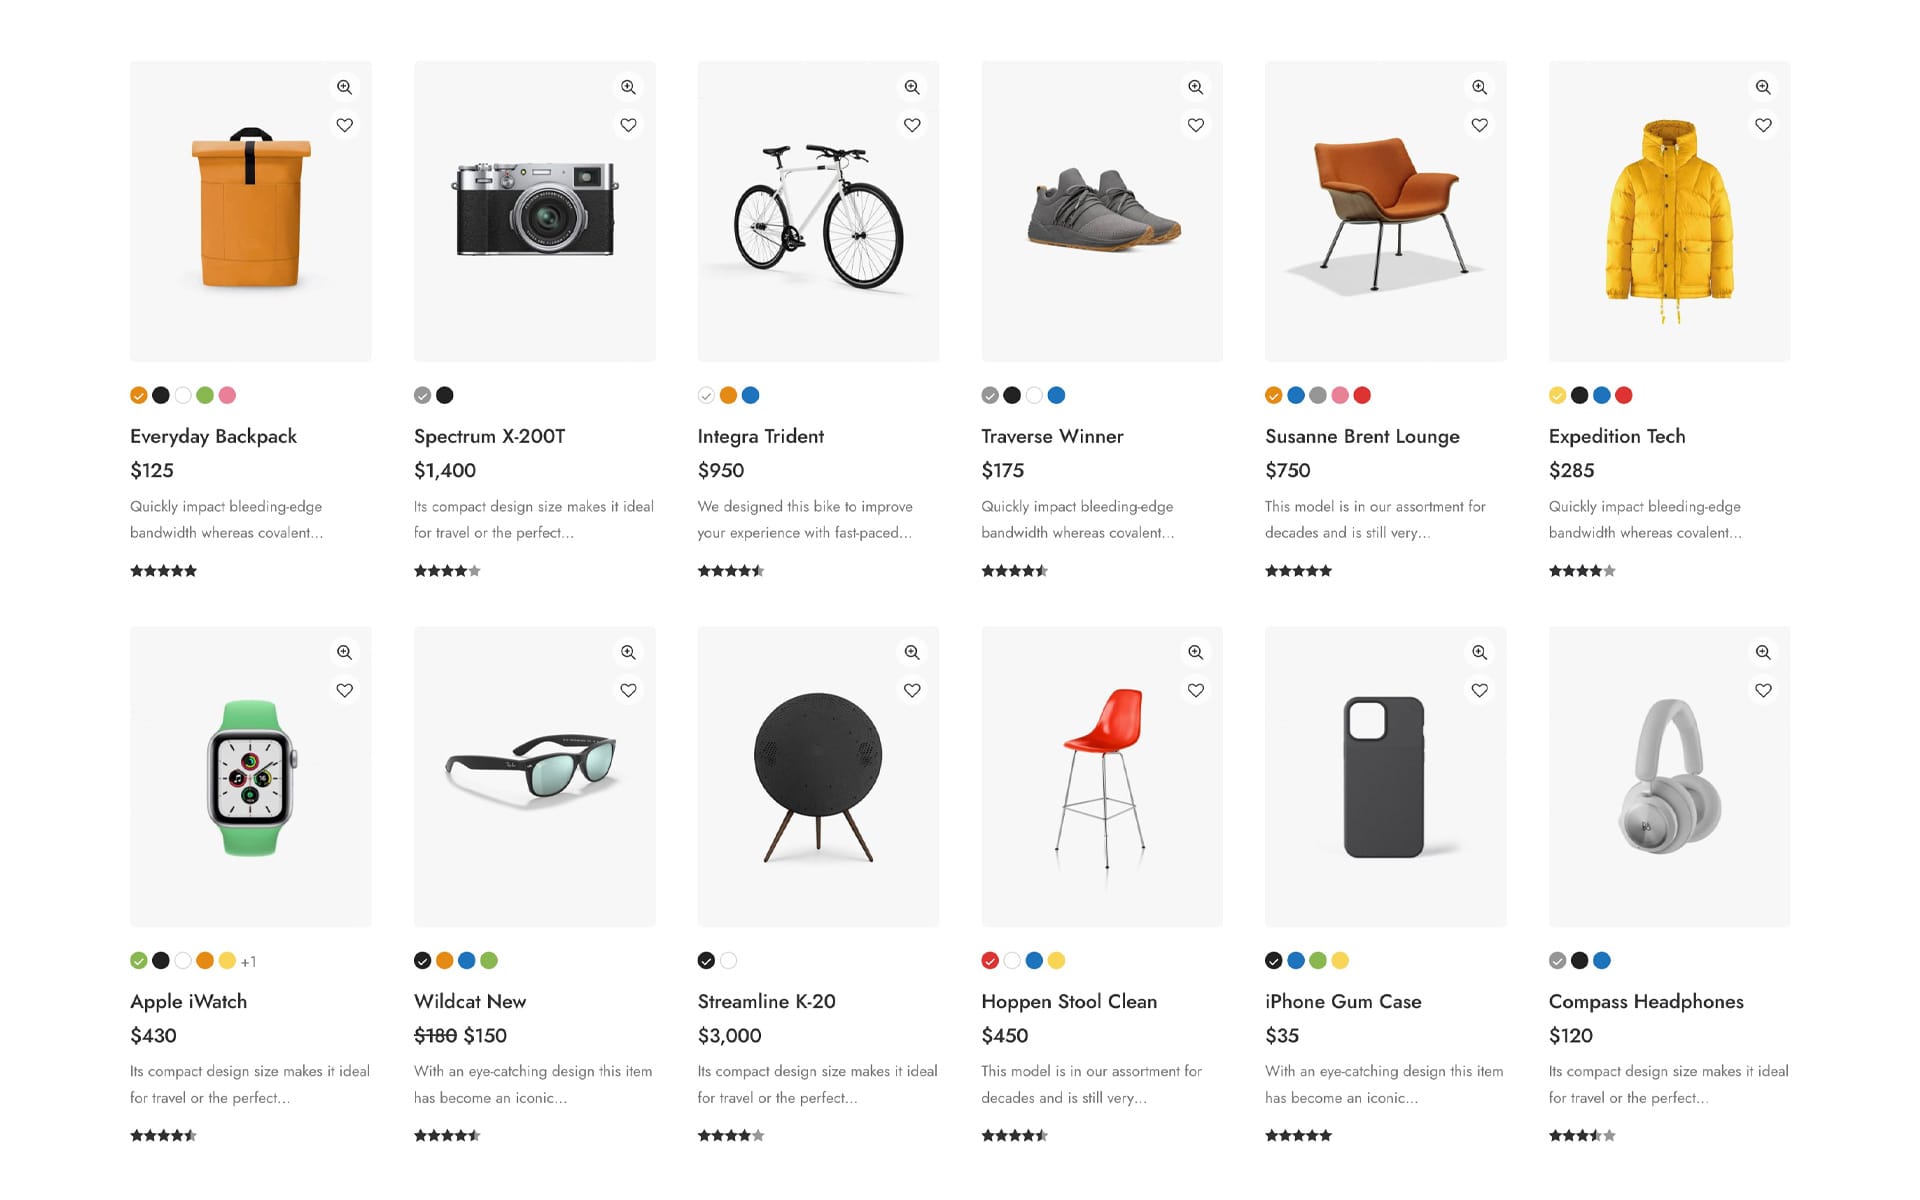
WooCommerce shops have to draw their customers in for high conversions. If users have accessible experiences when looking for the specific products they want online, they are likelier to complete purchases. One of the best ways to give your users a good shopping experience is to avail of products with variations in sizes, prices, photos, and colors.
Unfortunately, the default interface of WooCommerce offers only a too simple and inadequate dropdown element to present the product variations.
With Variation Swatches, visitors can select and purchase products based on sizes and prices that attractively fit their specifications. Then, you can impress them with colors and images and make them buy – on impulse – items that excite them.
From Uncode 2.7.0, it’s, in fact, possible to replace the standard variation dropdowns with color, image, and text swatches. Help customers make decisions more quickly with a visual and user-friendly experience.
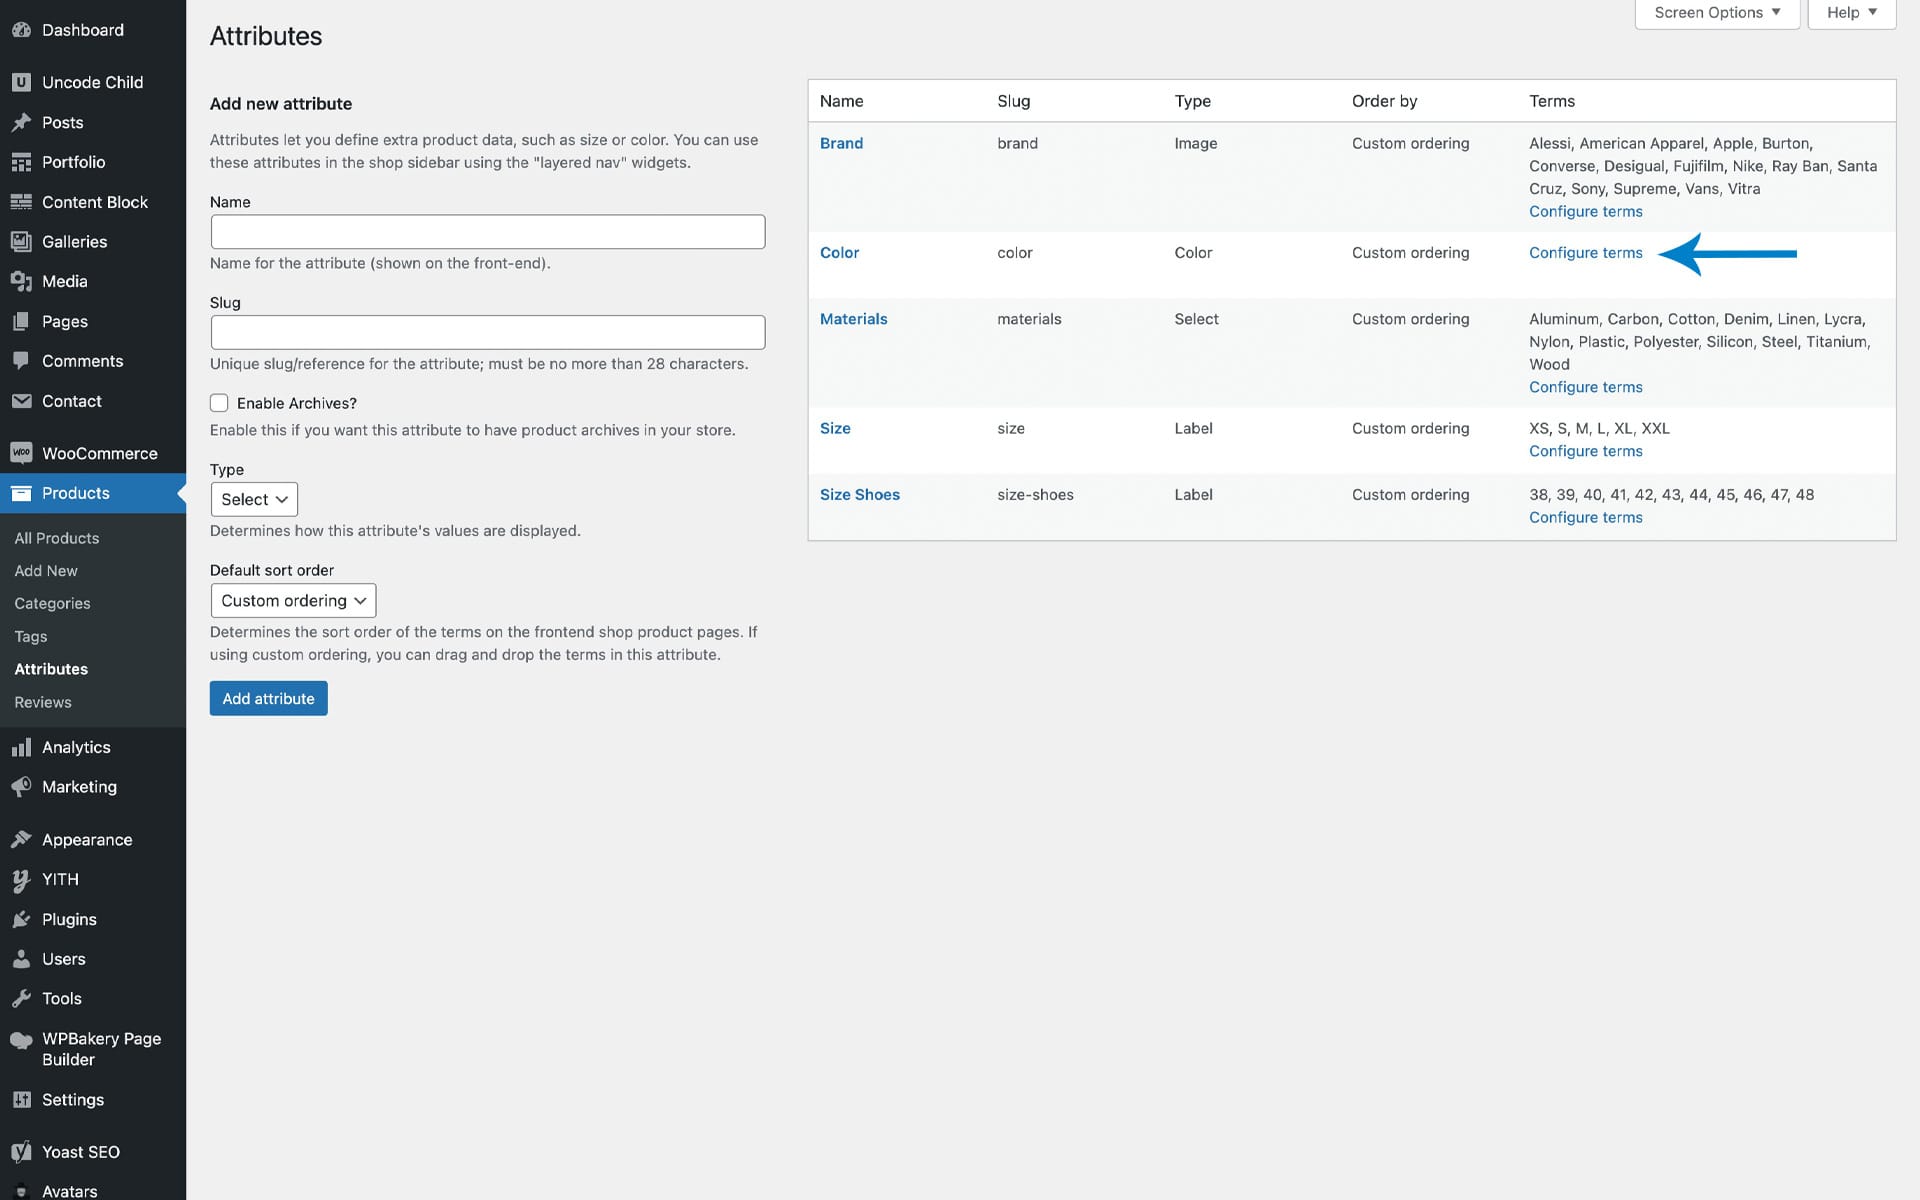
Variation Swatches types
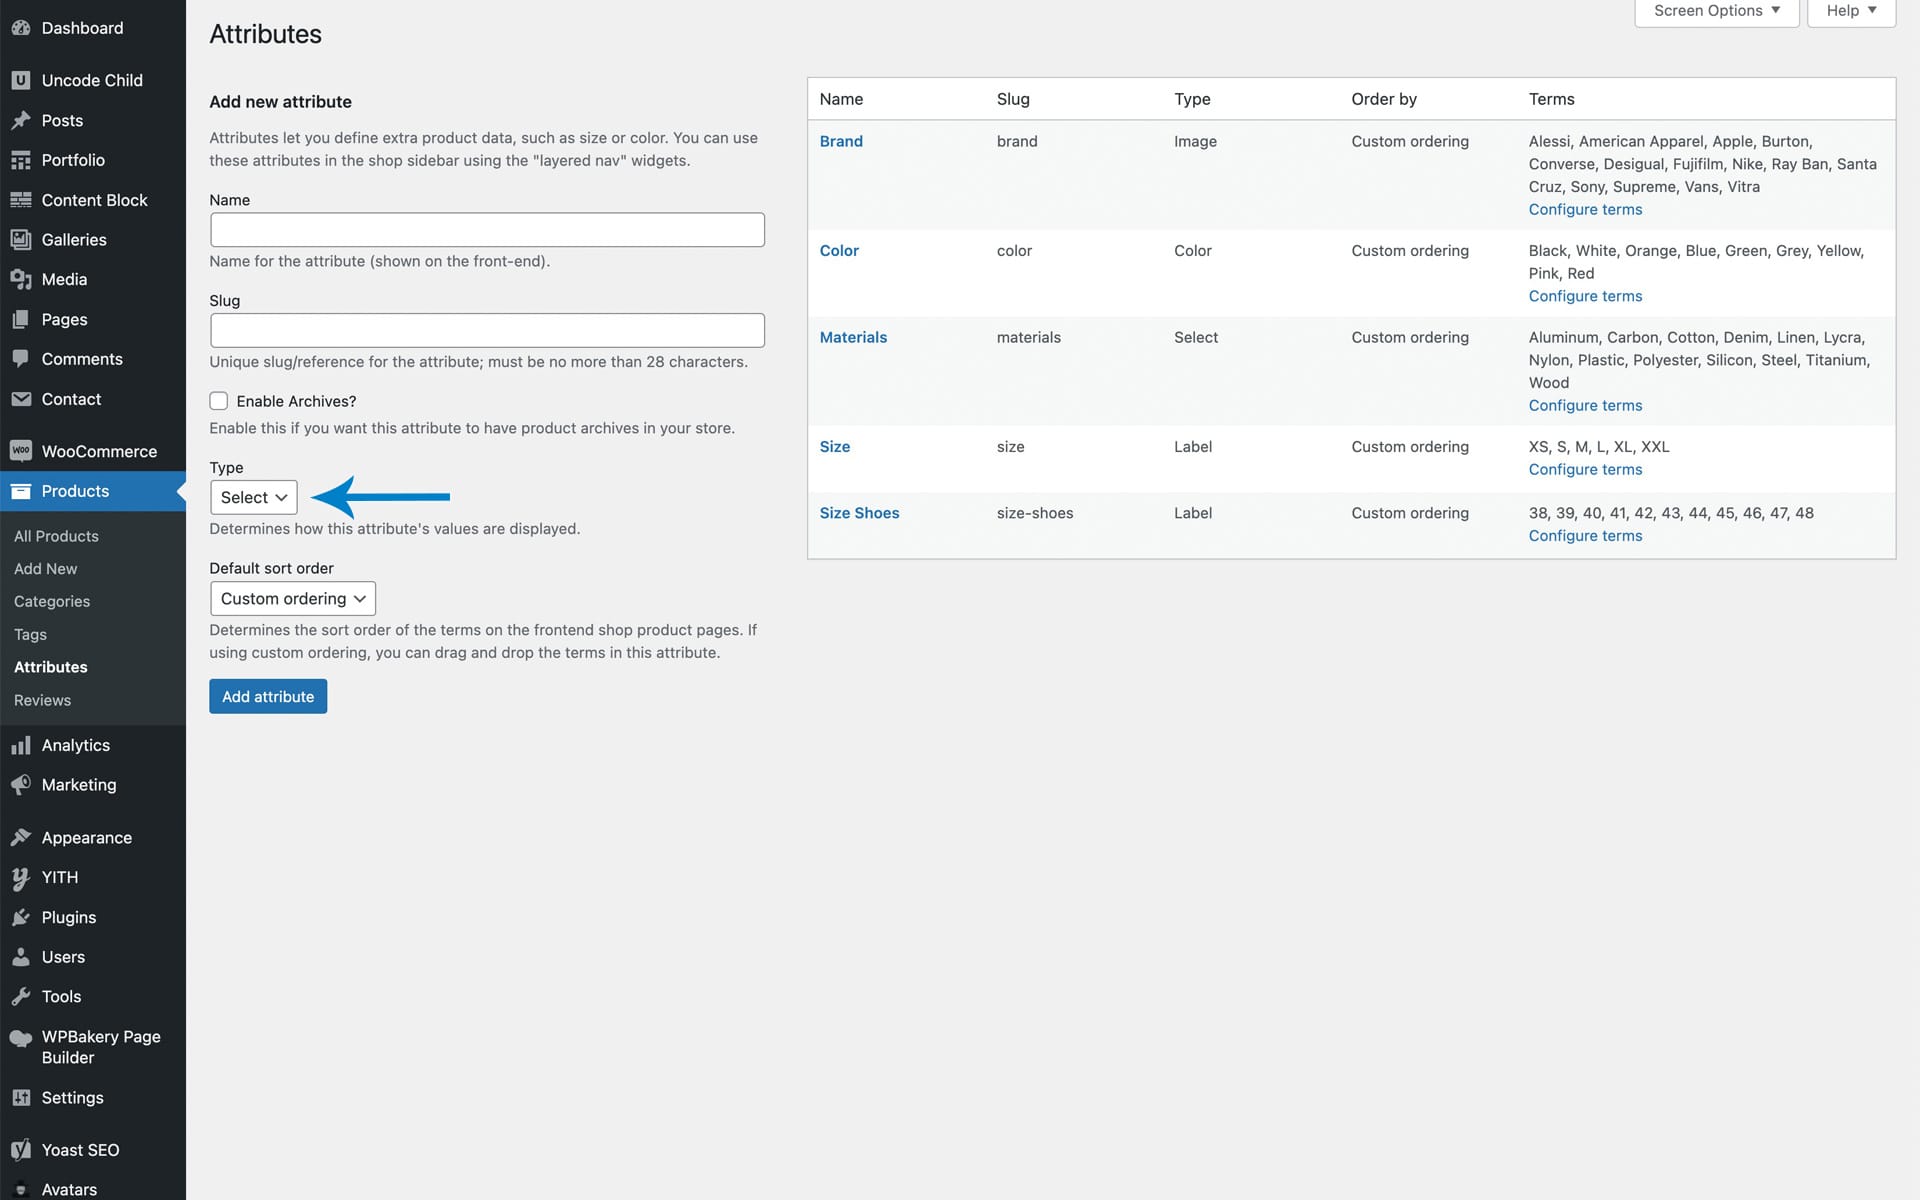
Four types of Swatches determine how attribute’s values are displayed, and this can be selected when creating an attribute, screenshot .
- Select: used for the classic dropdown;
- Color: used for color variations;
- Image: used for brands or fabric variations;
- Label: used for text variations.
How to create a Variation Swatch
You can manage any attribute globally with WooCommerce Variation Swatches. All you have to do is follow the following quick, simple steps:
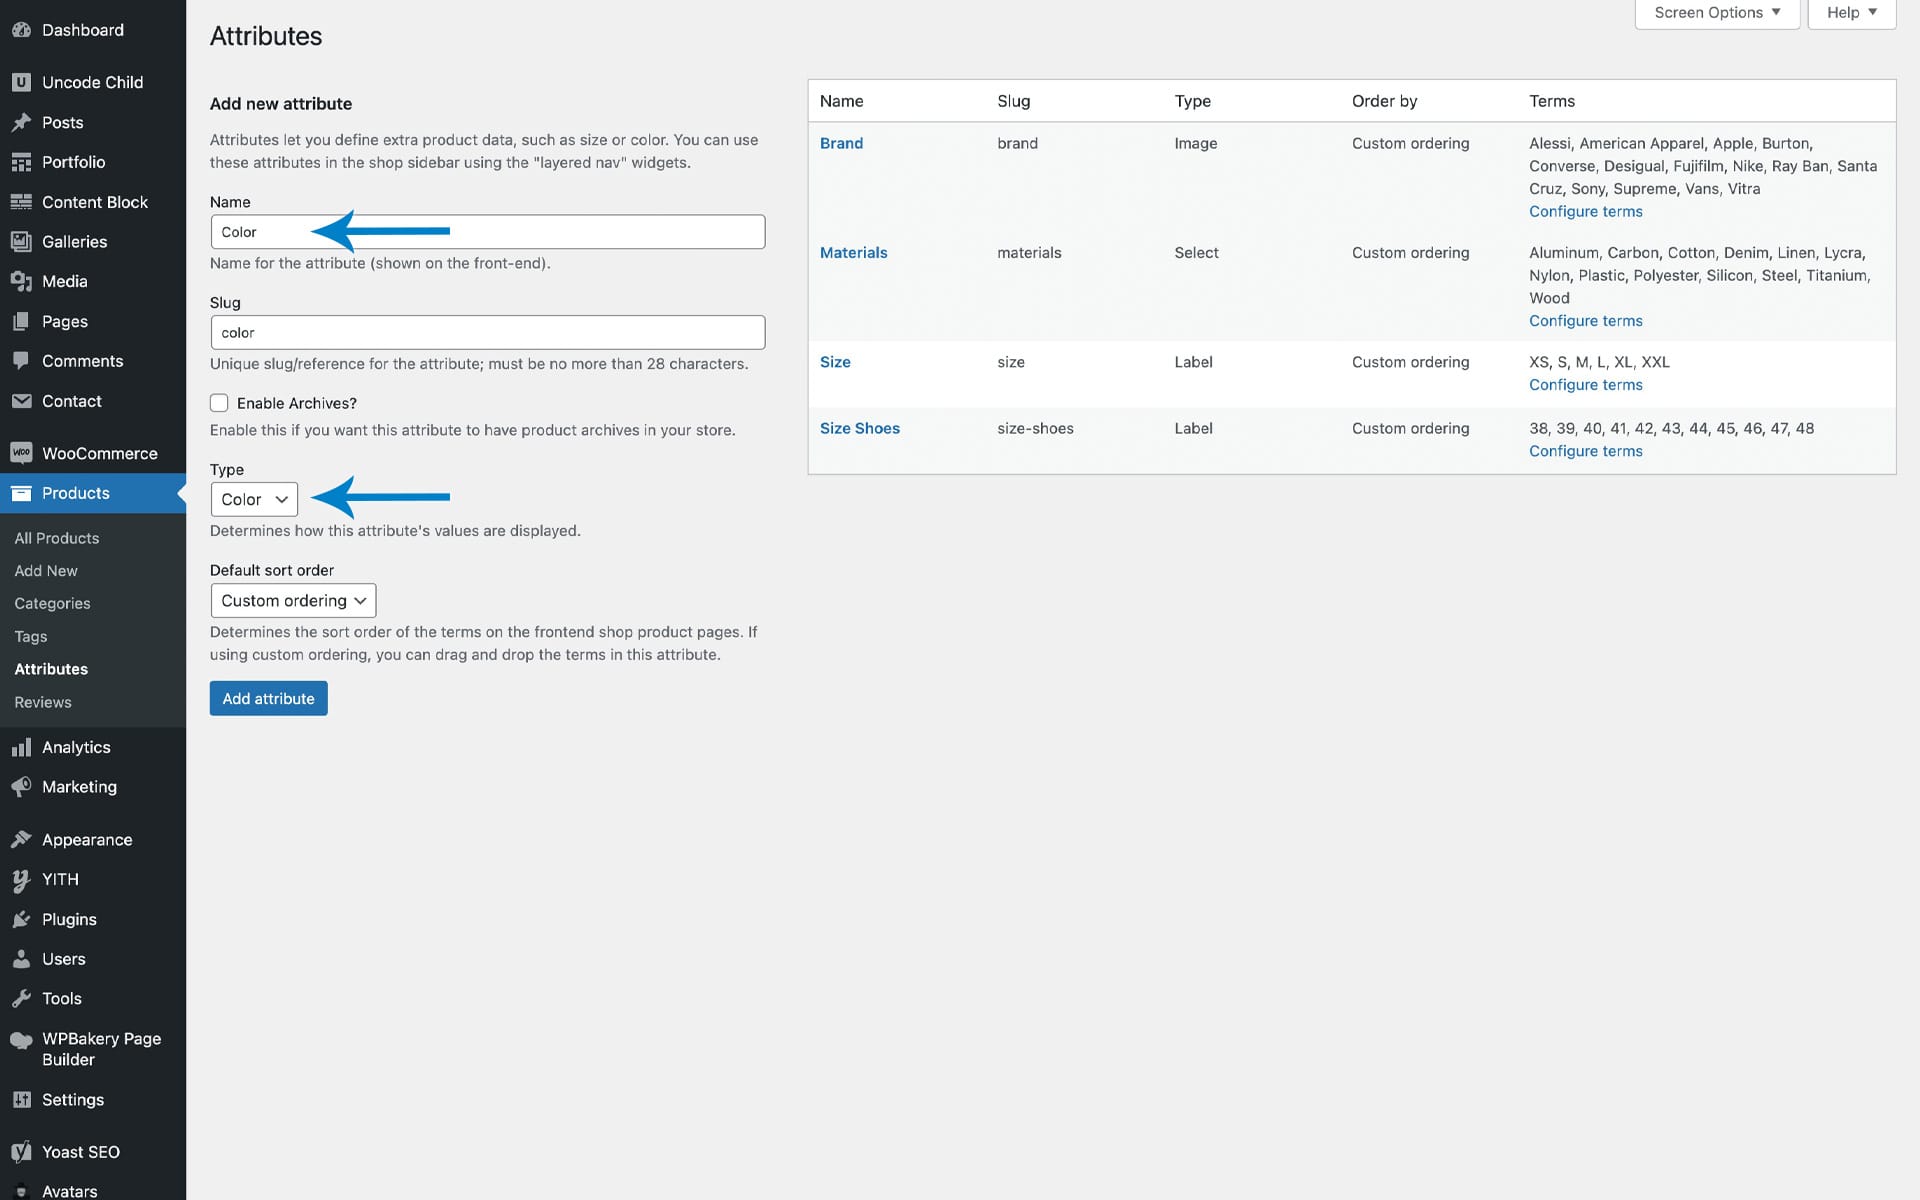
- Navigate to Products → Attributes;
- Create a new attribute. In this example, name it ‘Color ‘ and select the Type ‘Color’, screenshot ;
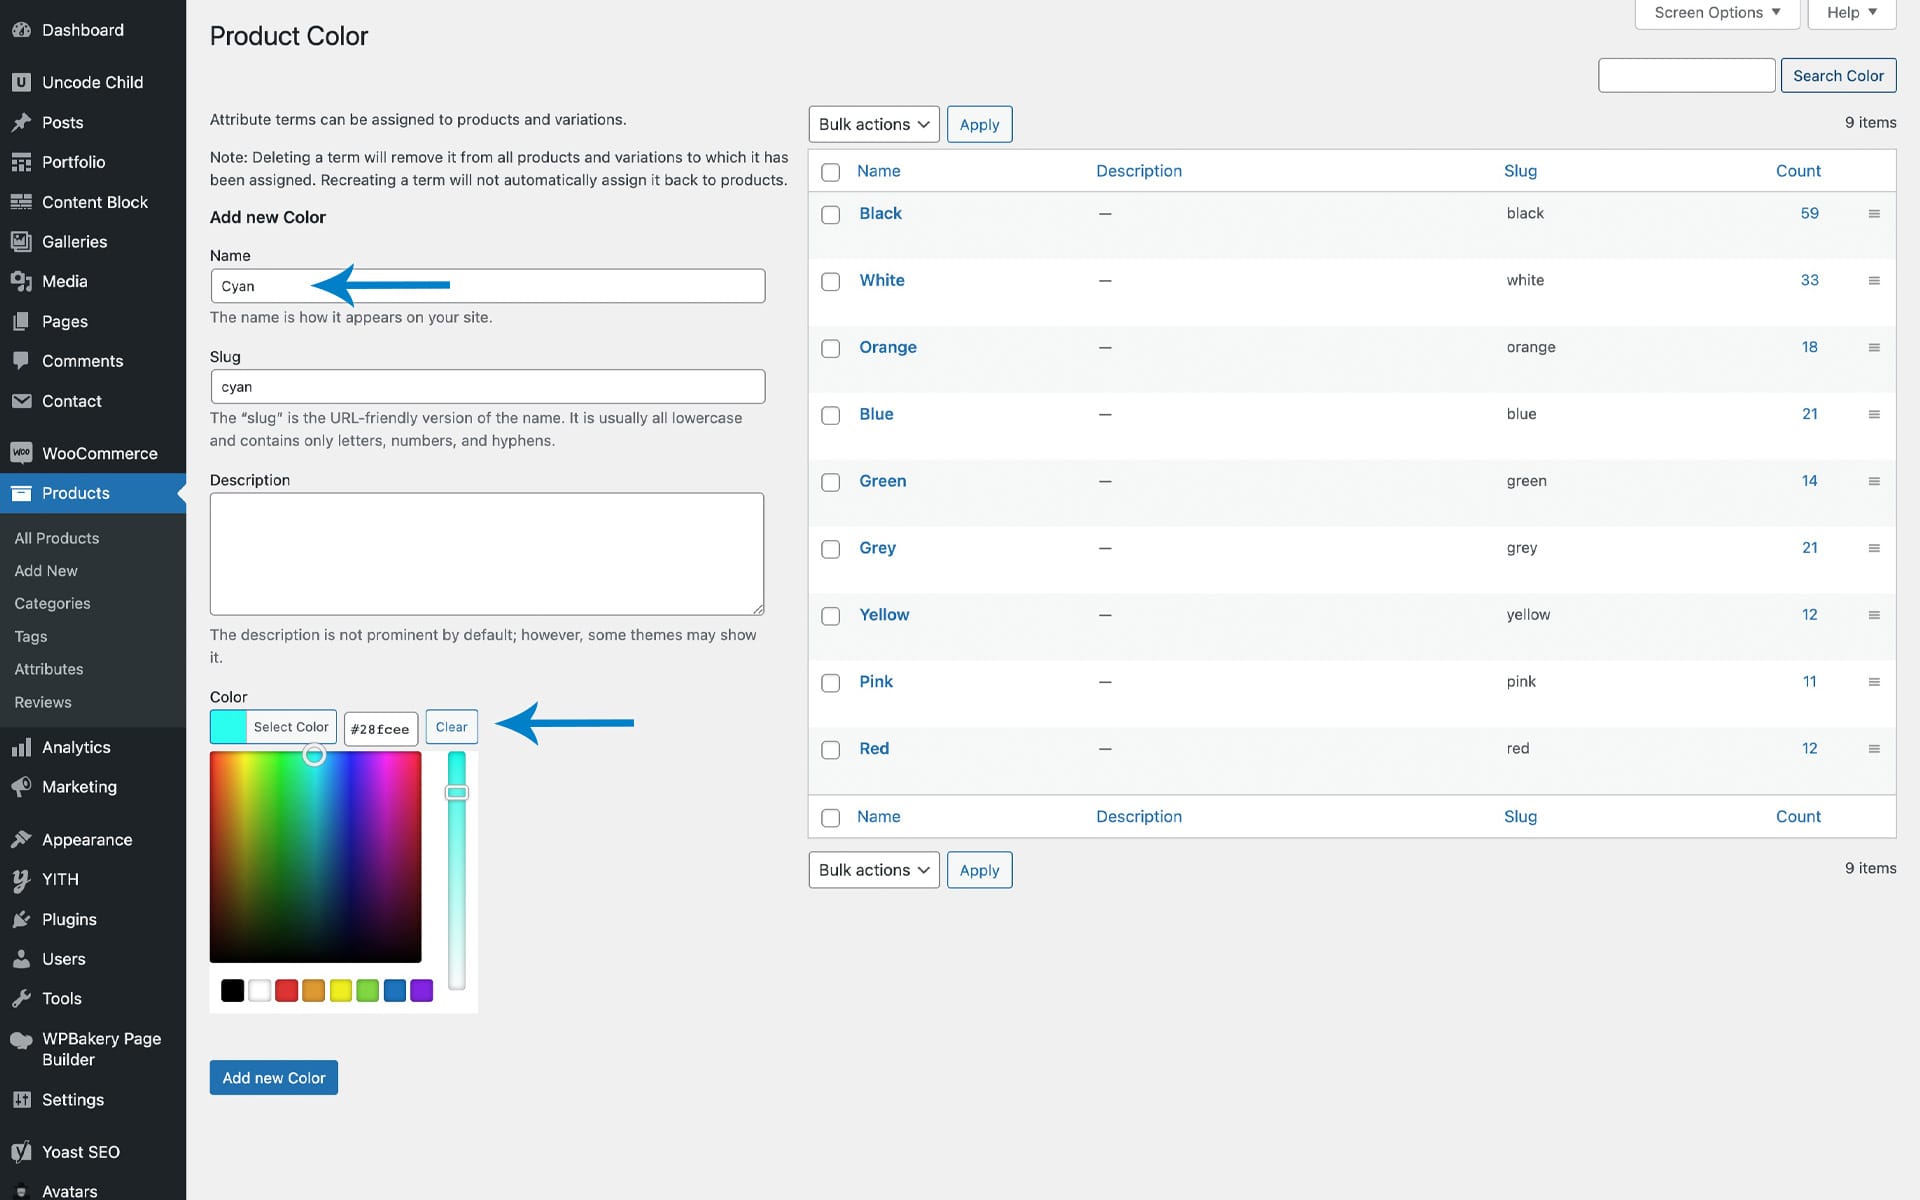
- Once the new attribute has been created, navigate to the Terms configuration, screenshot ;
- Add a new term and select the value; in this case, select a hexadecimal color code, screenshot ;
- Repeat for as many terms as you need to implement your variations;
- To use the newly created Variation Swatch, apply the variations you created to your variable products by following these simple steps.
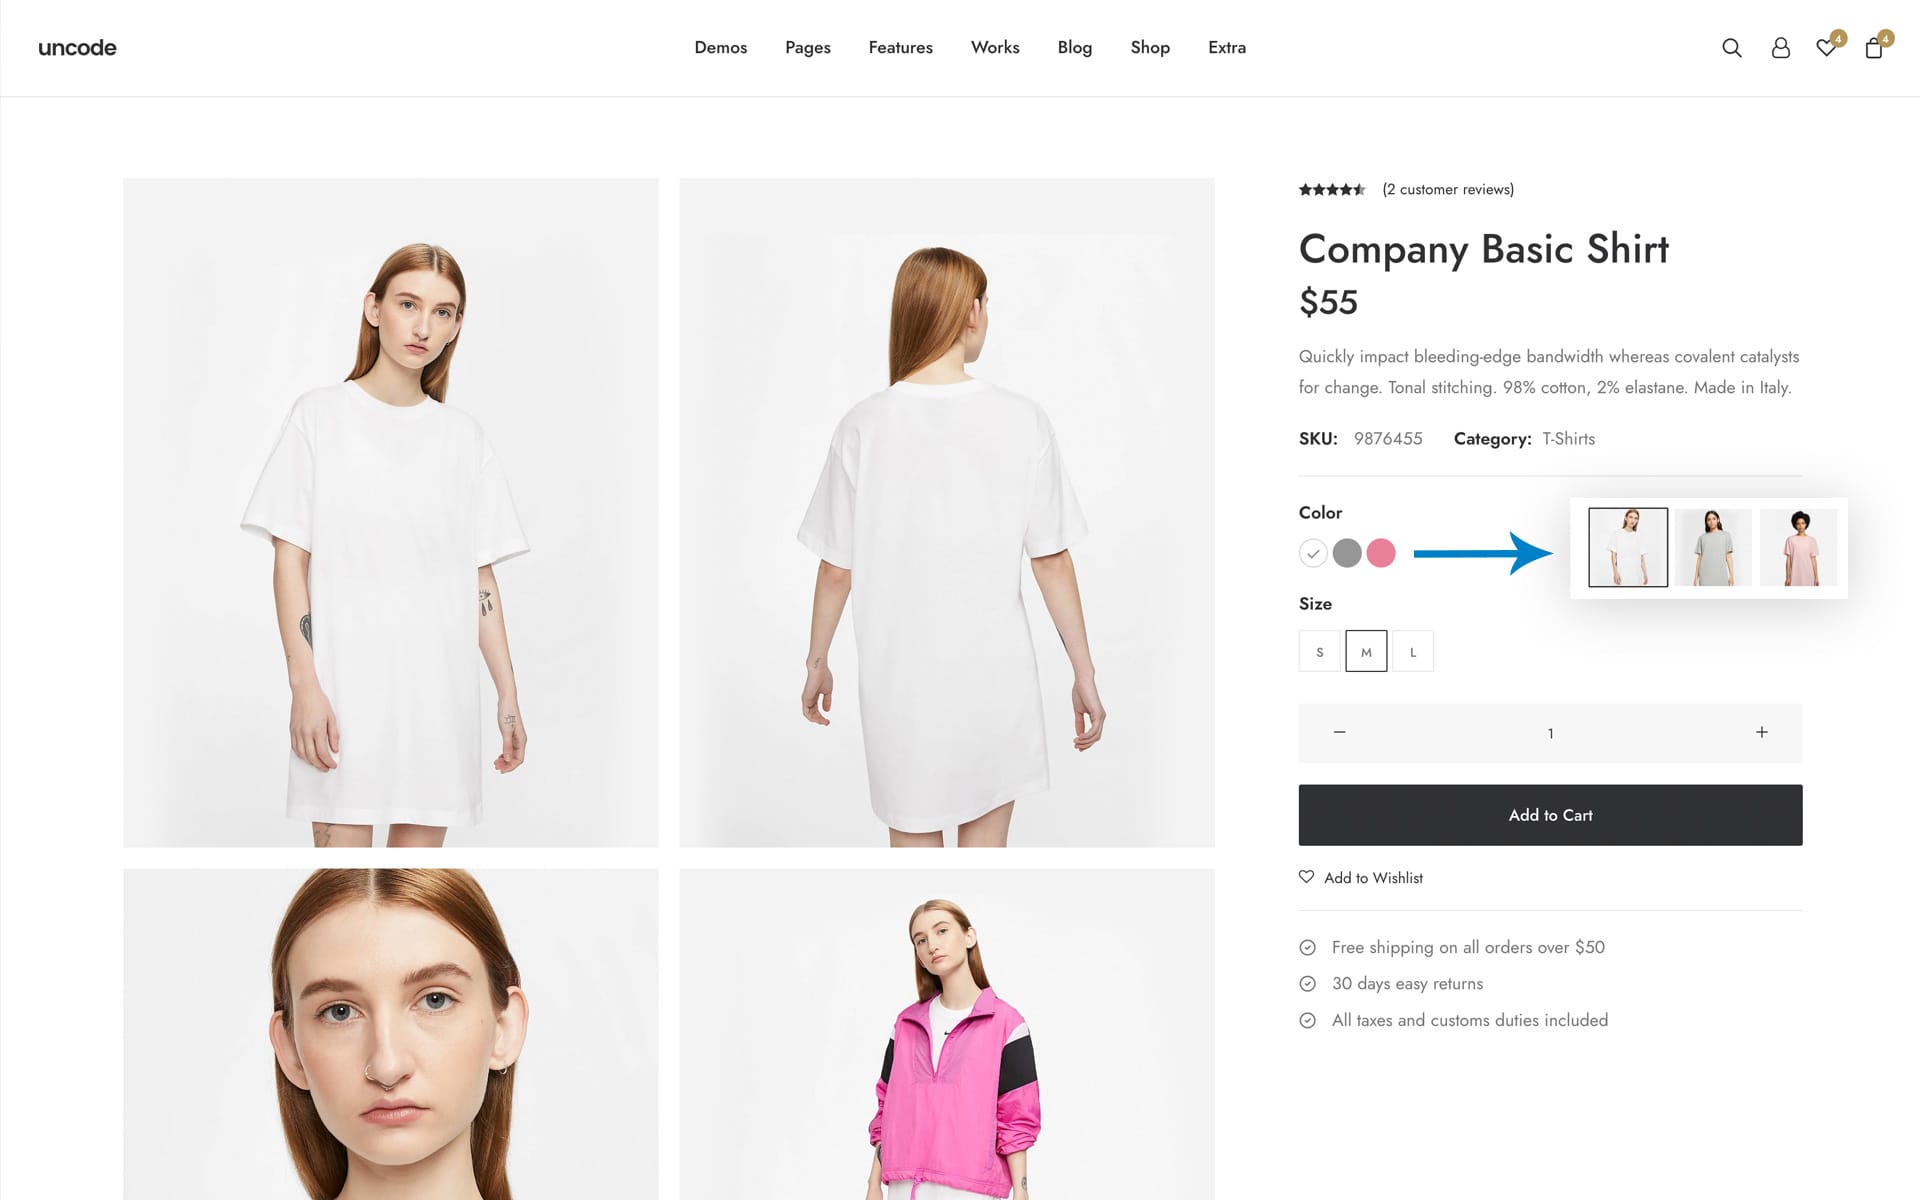
Swatches with Thumbnails
Uncode presents an advanced option that allows creators to display images chosen for the product variations as the Variation Swatch element. In a nutshell, if you have created a color swatch, you can present the image of the corresponding variation instead of showing the color swatch, screenshot ;
Please find this option in Theme Options → WooCommerce → Swatches with Thumbnails, screenshot .
How to use Swatches with the Post Module
In Uncode, we implemented advanced options that generally can only be realized through premium paid plugins. One is the ability to preview the Product Variations on the product thumbnail in the Shop Page (or Catalog), screenshot ;
By adding swatches to the shop and catalog pages, customers will be able to see what’s available, even before visiting the product page. Moreover, they can change the product image when clicking a swatch or link through and pre-select the variation.
Please note that these features are only available for the Posts module. This means they do not work on the default layout but must be enabled through the Posts module with Automatic Query functionality and a Content Block. Here is a short tutorial on creating a Content Block for your shop.
Variations in the Posts module
Activating Variation Swatches in the Posts module is simple:
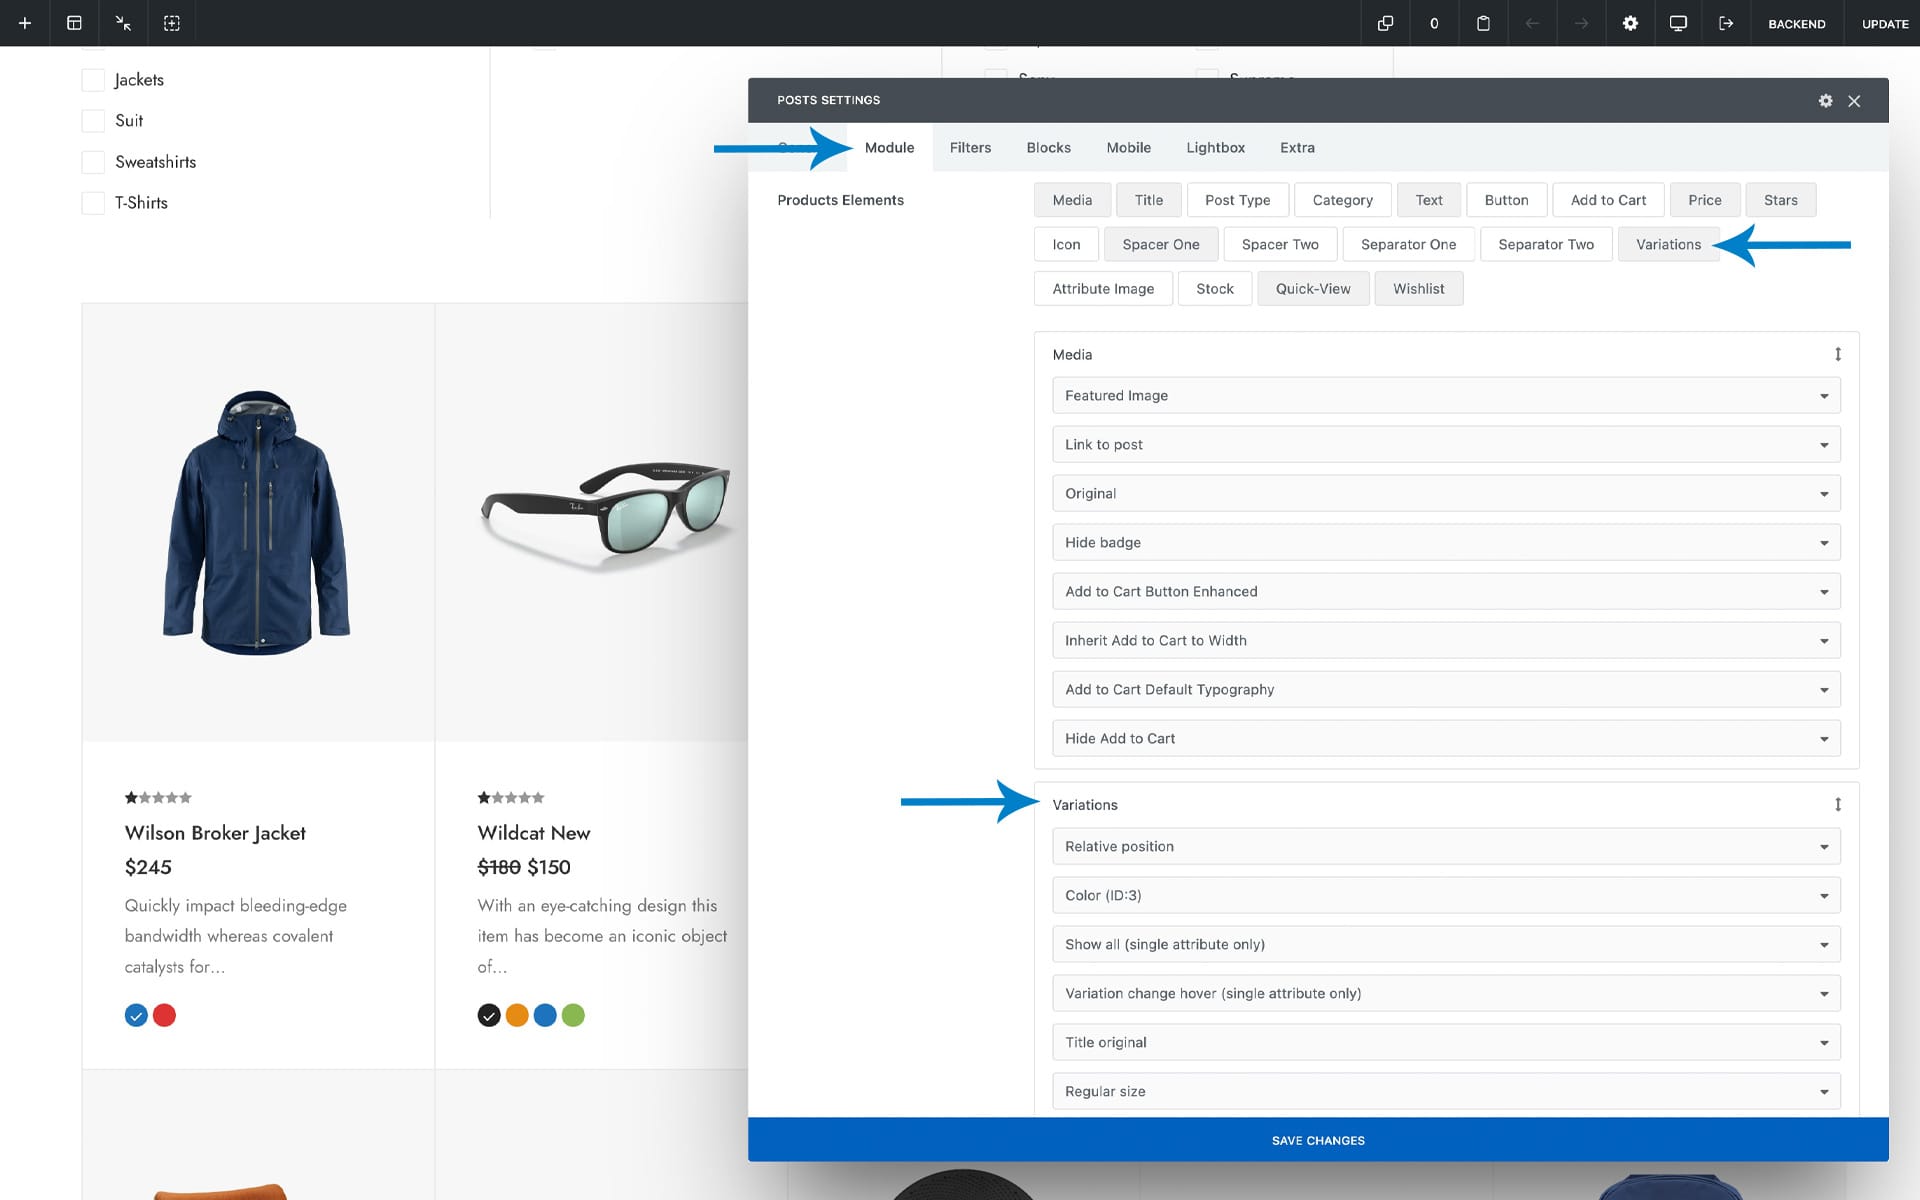
- Open the Posts module settings;
- Navigate to the Module tab and scroll down to the Elements list;
- Insert the Variations element and configure its options, screenshot .
Posts Variations element options
- Position: choose whether to display the swatches in the relative position or above the image;
- Attributes: choose whether to show all swatches or only a specific one. On the analysis of many e-commerce websites, we recommend choosing a single swatch significant of its variations (such as color). However, you can evaluate it yourself based on the needs of your store;
- Number of items: choose whether to show all variations or a specific number.
- Variation change: choose whether the change of variation applies to the click or hover event;
- Title: choose whether the title remains the original or must change to include the name of the variation as well. Be careful because if the new title is longer and exceed on a new line, this also involves a mandatory shift of the layout:
- Size: choose three different sizes for swatches;
- Visibility: select the visibility depending on the device in use.
Notes
- Variation Swatches in archive (and category) pages work only with custom layouts created via a Content Block using the Posts module (not with the default simple layout).
- Please note that if you are using the Variations element of the Posts module with the Content Overlay layout, you need to set the Posts Settings → Blocks → Multiple Click Areas to Yes.
- To take full advantage of the features, when creating product variations, please create all variations with all combinations. For example, pay attention not to use automatic variations like ‘Any + attribute name’. Instead, using the ‘ Create variations from all attributes‘ option is always recommended.
Links
Ajax Filters (Products, Posts and Portfolio)
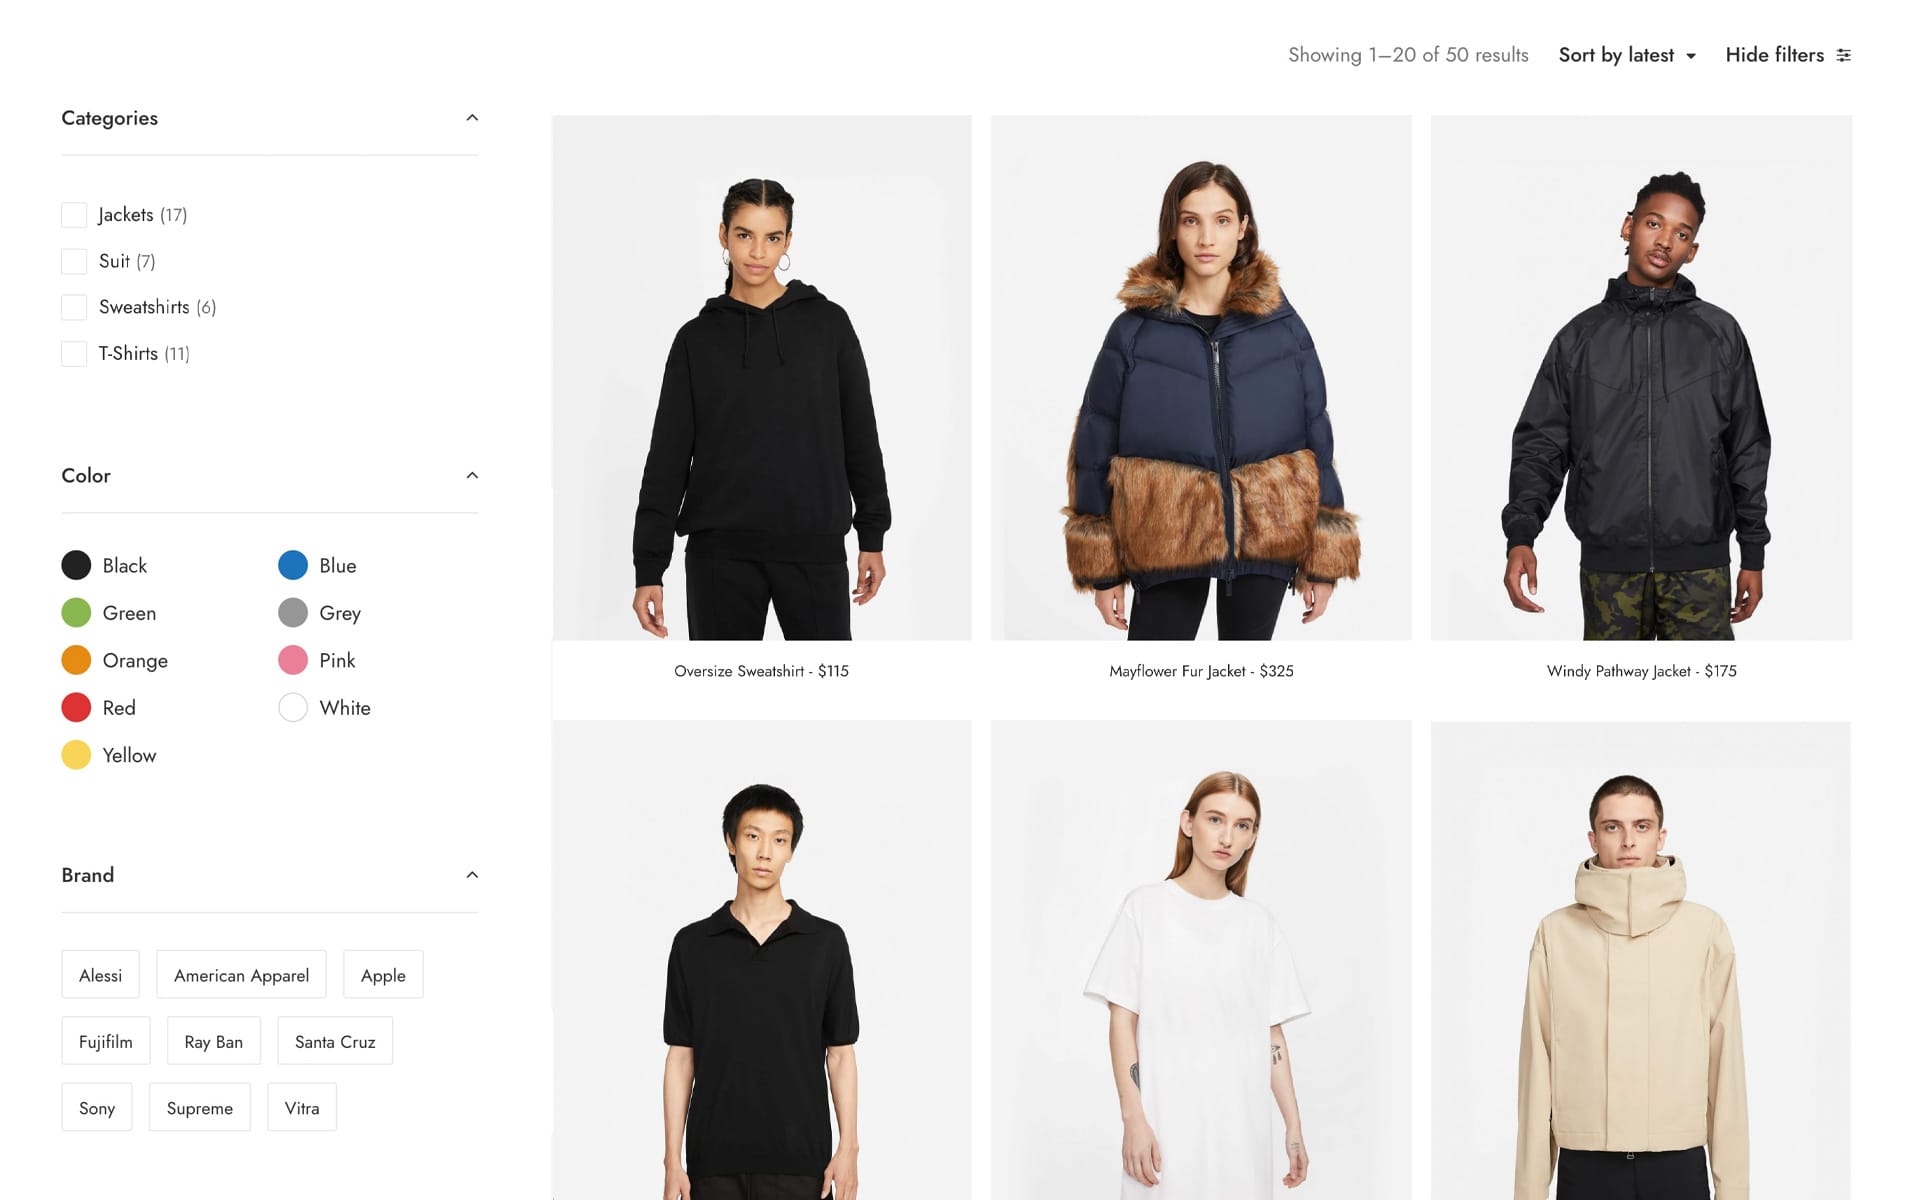
Since Uncode version 2.7.0, it is possible to implement Ajax Filters without using extra paid plugins with an advanced solution seamlessly integrated into the theme.
Filters are essential for any eCommerce website. Categories work fine when you have a few dozen products, but if your store has hundreds or thousands of products, customers will struggle to find what they’re looking for. Furthermore, if people can’t locate the things they want to buy quickly, they’re more likely to leave your site and shop with one of your competitors. Filters give shoppers a way to rapidly uncover the products they want, and there’s no better option for WooCommerce stores than Ajax Filters.
Using the Uncode native Ajax Filters, your customer can filter products by size, color, category, price, and more with Ajax-powered results. In addition, Ajax technology speeds up results viewing because it can filter posts without page reload. Uncode native Ajax Filters allow your users to filter products based on their needs (category, size, color, brand, price, and much more), and in a few seconds, they will find what they want to buy. A simple and powerful tool to address your customers toward their ideal product, speed up the purchase process and improve the conversion rate of your online shop.
How it works
Working with configurable Ajax Filters requires that some components of Uncode are configured to work together
- A Posts module which will be the main element on which the filters will work;
- That the Posts module is connected with a few Ajax Filters widgets (via Content Block for the advanced setup or via class for the simple setup);
- Configuration of the Ajax Filters widgets as needed .
Posts with advanced Ajax Filters
As of Uncode version 2.7.0 within the Posts module, the new Filtering Ajax option is available when using the Grid and CSS Grid modes (recommended method);
To activate the new Ajax Filtering method, please open the Posts module Settings → Module tab → Filtering → Ajax, screenshot ;
Please also note that when activating Filters, of whatever kind these are, the related options have been moved to the new dedicated Filters tab for improved clarity and organization, screenshot ;
In the Filters tab, please find new settings that allow you to create different layouts ready to meet every need. Among essential options, please note:
- Ajax Filters: connect a Content Block that host the specific Ajax Filters modules;
- Layout Sidebar: use this option when filters are placed vertically in a sidebar that is sideways to the Posts module, screenshot ;
- Layout Overlay: Filters are placed vertically in a sidebar that overlays the Posts module, screenshot ;
- Layout Horizontal: Filters are placed horizontally above the Posts module, screenshot .
- Behavior: set if the sidebar is open on load, closed on load, or always opened.
- Sidebar: desktop and mobile position, gap, width;
- Menu: position above or inside the Posts loop, typography, uppercase;
- Toggle Filters: position and hide/show text;
- Active Filters and Clear All: visibility and position;
- WooCommerce Sorting: visibility and position, text and style;
Ajax Filter Content Block
As anticipated, filters are created via an external sidebar Content Block connected to the Posts module; this allows you to organize the necessary Ajax filters according to your functionality and design needs. In a nutshell, you can create your sidebar with filters as you see fit.
To create a new Ajax filter sidebar, please follow these simple steps:
- Create a new Content Block and save it with a name of your liking, screenshot ;
- Create a Row and insert a few Ajax Filter widgets inside it, screenshot ;
- Configure the widgets options according to your needs (please refer more in the ‘Ajax Filters module’ chapter), screenshot ;
- Connect the Posts module to the new Content Block containing the Ajax Filters, screenshot ;
Ajax Filter module
The Ajax Filter module is a new, highly configurable widget. With this module, it’s possible to create advanced Ajax filters that you can use for your Shop, Blog, Pages, or Portfolio.
The options in the module help change the source, functionality, and design. Let’s look below at the main options you can use to create your filters present in the General tab, screenshot :
- Title: display the widget title;
- Query: select the source. It can be a Taxonomy, Search, Date, Author, Price, Status, Ratings, or Sorting;
- Taxonomy: select from Post Categories, Post Tags, Product Categories, Product Tags, Portfolio Categories, and Page Categories;
- Attribute: select an attribute (from the one created);
- Type: set the primary look of the widgets; it can be Inherit, Text, Select, Checkbox, Label, and Logo (Image).
- Display: choose if display items in List, Inline, or Columns mode;
- Label: display the label;
- Count: display the number of items;
- Allow Multiple Selection: enable if the user can select multiple terms when filtering.
In the Style tab, please find options useful to define the visual aspect and behaviors, screenshot :
- Widget Style: required to enable advanced options;
- Desktop, Tablet, and Mobile Collapsed: activate to collapse or not the widgets on click or on load.
- Collapse Icon: choose from the chevron or plus sign;
- Remove Separator: remove the separator between the title and content;
- Title Typography: use the default or inherit from the Column typography:
Let’s look at some use cases below:
- Ajax Filters Categories, screenshot ;
- Ajax Filter Colors (custom attribute), screenshot ;
- Ajax Price Filter, screenshot ;
- Ajax Filter Materials (custom attribute), screenshot ;
- Ajax Filter Brands (custom attribute Image), screenshot ;
Posts with simple Ajax Filters
Please note that it’s also possible to create a simple Posts module that uses Ajax filters without using the unique Ajax Filtering method described above. You can, in fact, place some Ajax Filters next to the Posts module on the page thanks to the Page Builder; the only caution you must have is to indicate a particular class to the Row container, screenshot :
- Insert a Posts module;
- Insert the necessary Ajax Filters modules;
- Apply the class “ajax-filters” to the container Row, screenshot .
Notes
- Suppose we have Ajax filters on a category (or taxonomy) page. In this case, all terms will be displayed, and the Ajax functionality will be disabled to allow browsing the archives of other terms. Ajax functionality is enabled on the main store page but not in subcategories to allow browsing in different adjacent categories.
- Please note that the Ajax Filter module shows all filter values when working with the Frontend Editor. In a nutshell, the module is used as a placeholder and will work correctly once rendered from the final page.
- Please note that if I insert the Ajax filters directly into a plain empty page (which is not a Content Block), we will not see anything since the filters need a source of type Posts to be matched to reference a content to be filtered.
- Please note that only one Posts Ajax Filters configuration can be used per page.
- Please note that Ajax Filters will not work if we use the WordPress Permalink settings you have set “Plain”.
Links
TEST: from the Wireframes Plugin 1.5.0 please install sections by searching “Ajax Filters“. Here you will find some layouts and Ajax sidebars ready to be linked to the respective Posts module.
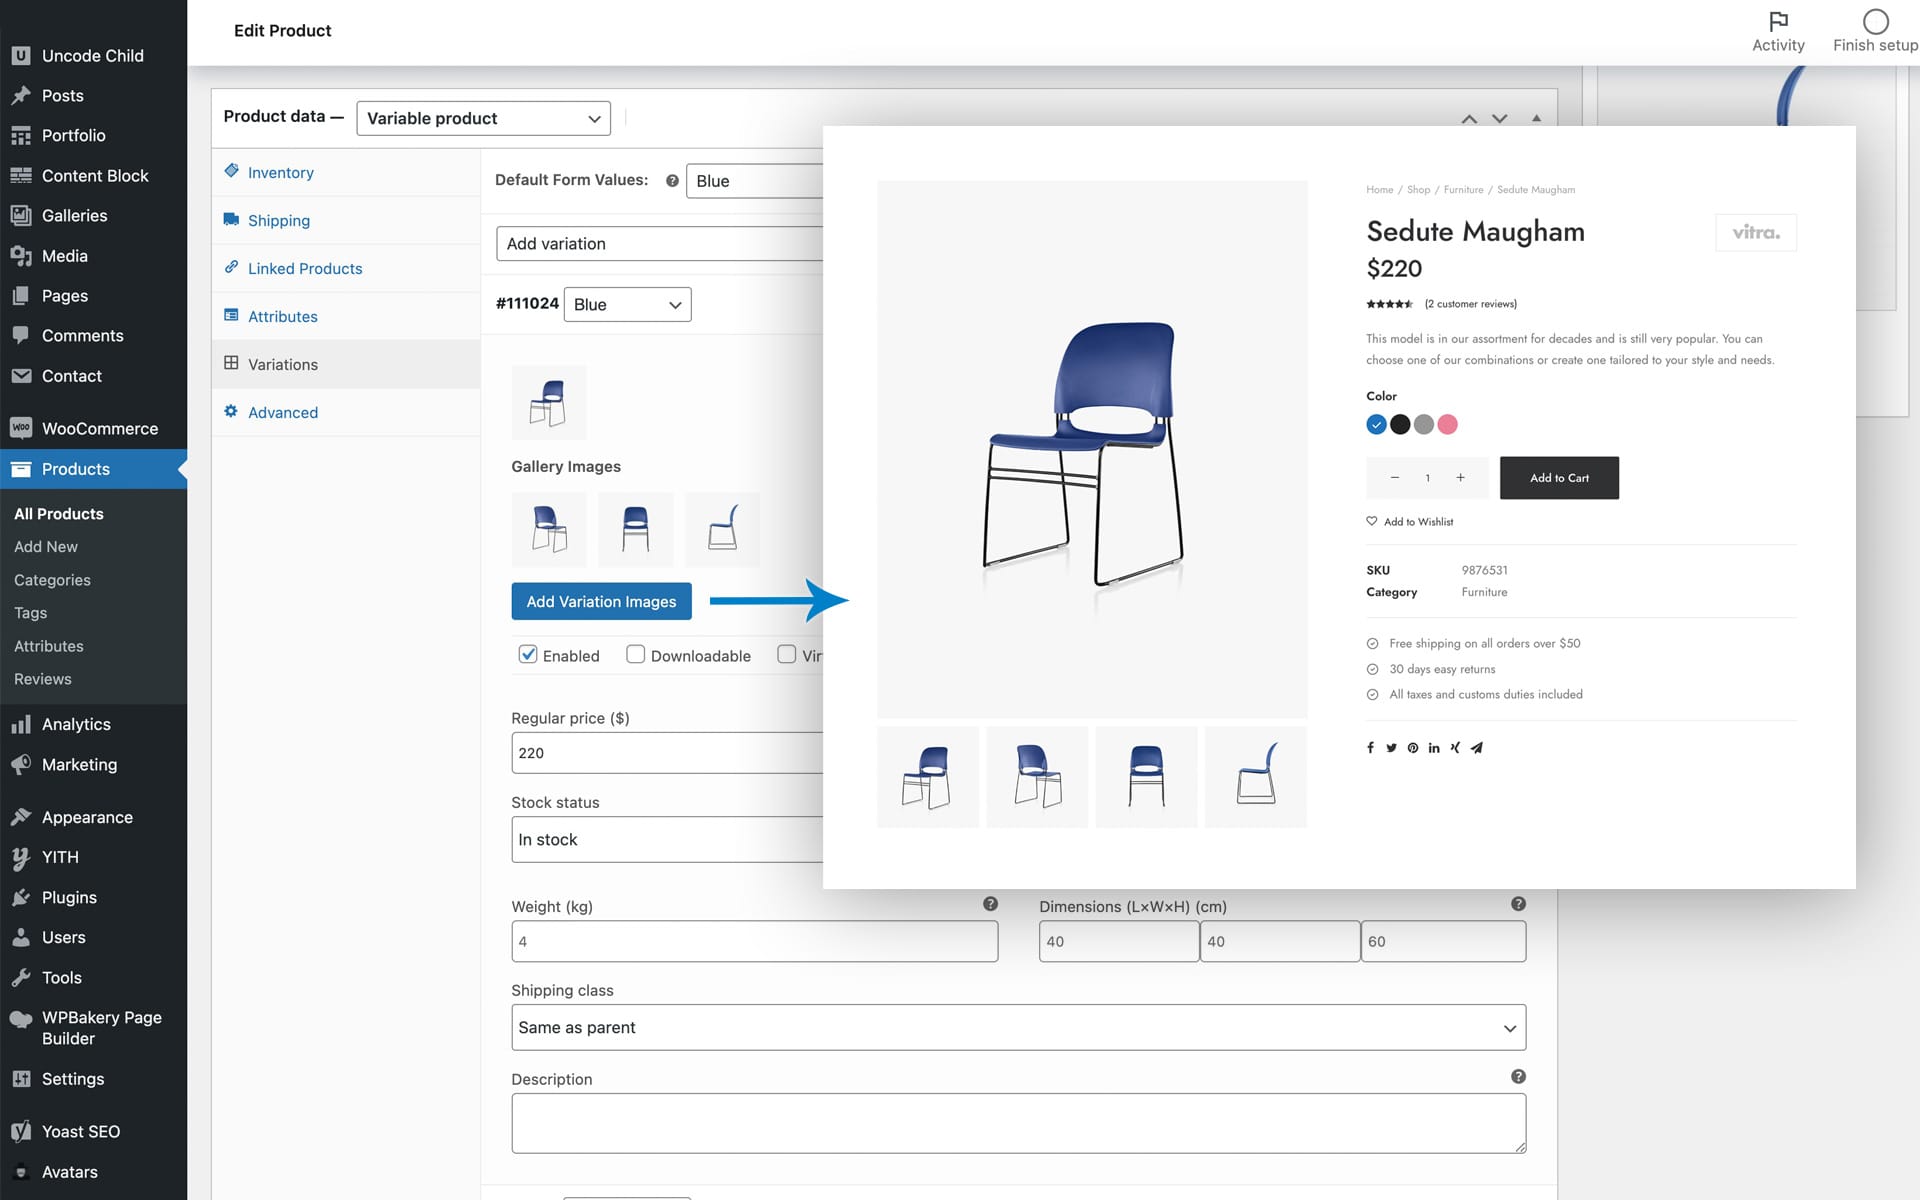
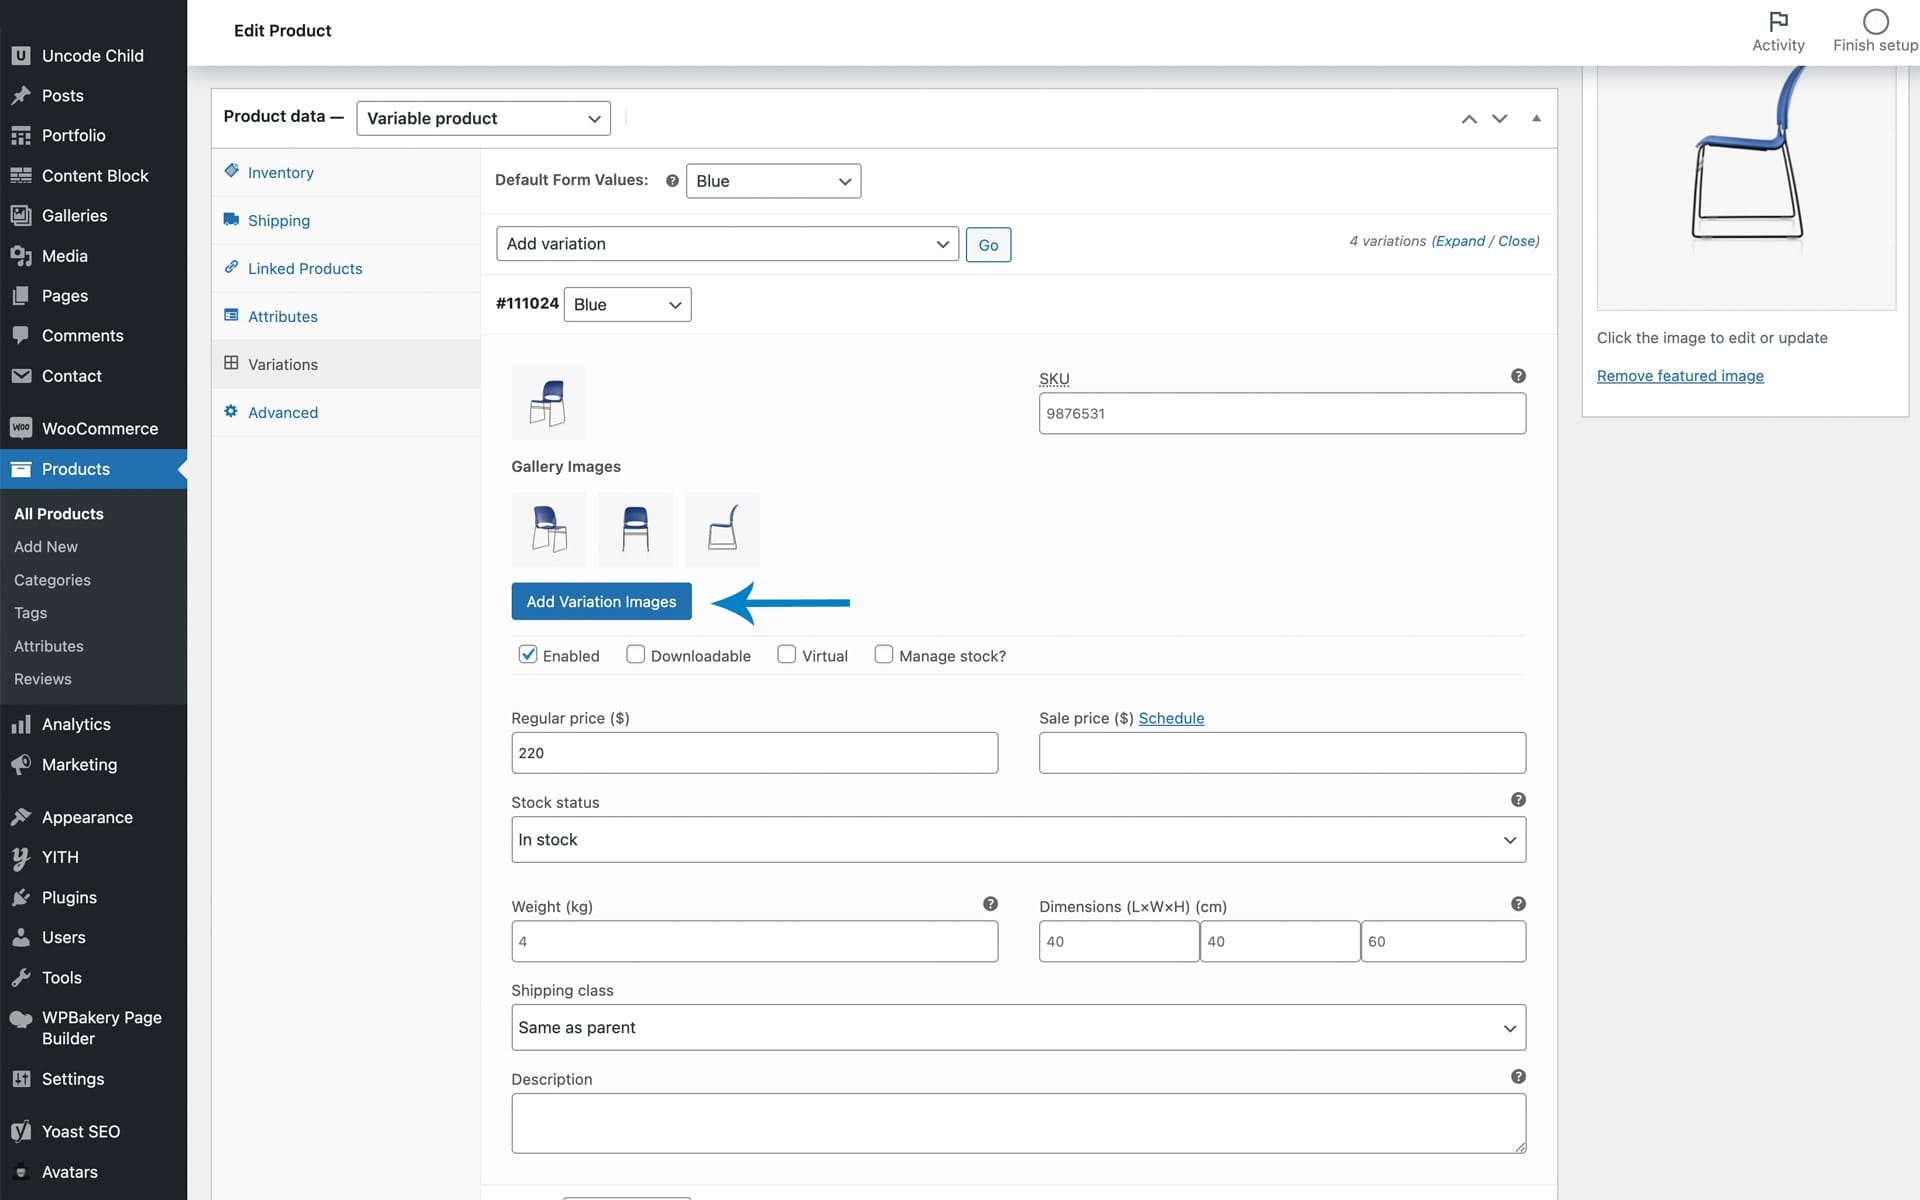
Additional Variation Images Gallery
WooCommerce changes only the main variation image when you select a product variation, not the gallery of additional images below it. In fact, by default, WooCommerce has only a single image to insert as a variation.
However, from Uncode 2.7.0, it is possible to have a dedicated gallery for each product variation without using extra plugins. This new option allows you to showcase additional images as a gallery for each product variation and enable you to upload unlimited additional images for each variation.
In addition, using this new option, it’s possible to showcase different images simultaneously when your visitors switch product variations like color, image, and style. This is an excellent solution if you need to display multiple images for your WooCommerce product attribute variation to increase sales and conversions.
How it works
Using this new option is simple and intuitive:
- First, make sure you have correctly created a variable product; for that, find our dedicated tutorial here: How to correctly set a Variable Product
- For each variation, select via the Add Variation Images button the dedicated set of images for a given variation, screenshot .
Note
Please note that the Additional Variation Images Gallery option only works using Uncode’s native advanced mode. In a few words, it doesn’t work if you use the default WooCommerce template that it’s possible to activate from the Theme Options → WooCommerce → Default Single Product Gallery option, screenshot .
Links
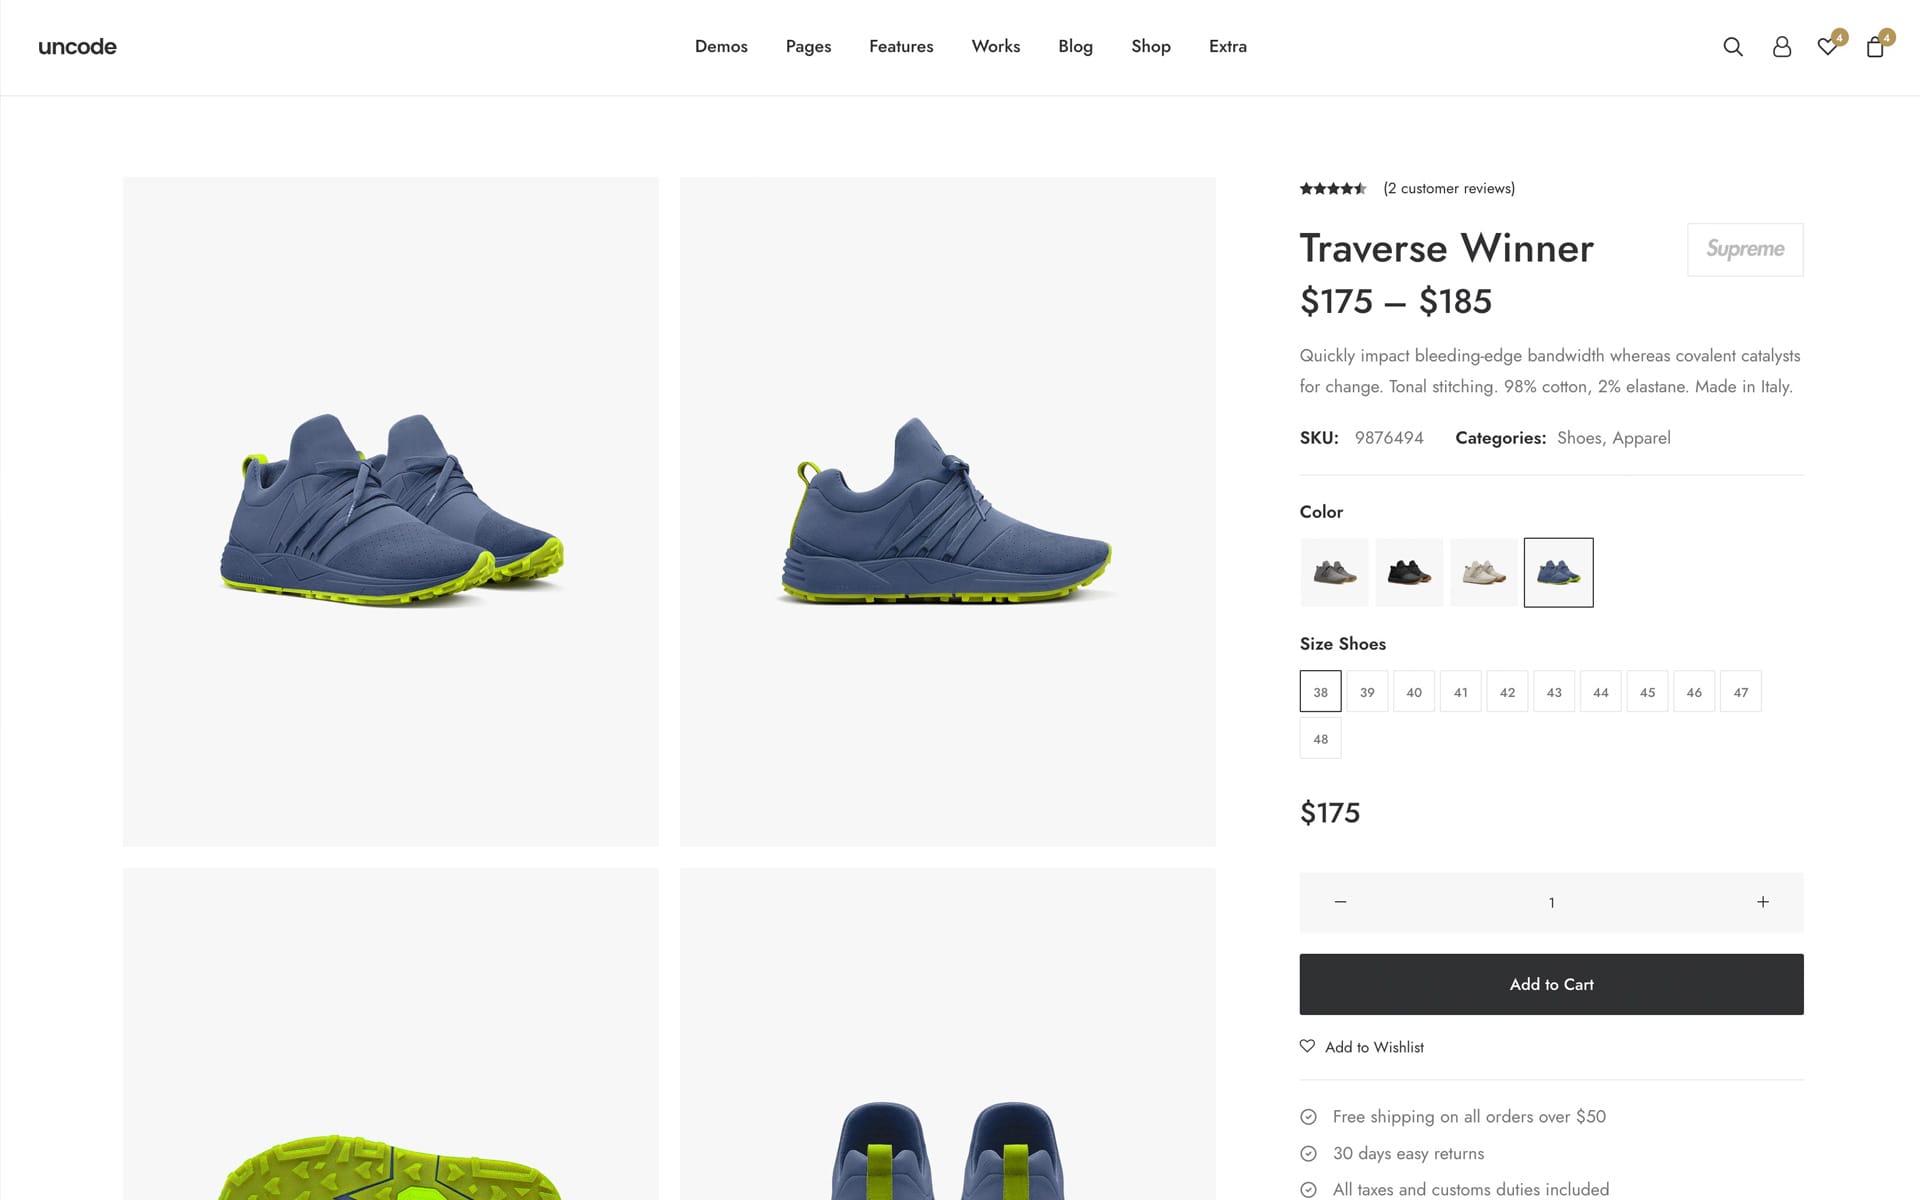
New single Product Gallery layouts
Uncode 2.7.0 introduces two new layouts for the Single Shop page Product Gallery. Thanks to these new options, creators have more flexibility in creating awesome functional and modern designs.
Product Gallery Grid
The first new layout is called Grid and presents a grid of thumbnails. This layout is perfect when you have simple or variable products with galleries. This design is trendy these days and is used by major fashion apparel eCommerce sites like Nike.com.
Product Gallery Lateral Nav
The second new layout is called Vertical Nav. The Vertical Nav creates a vertical list of thumbnails, thanks to which you can navigate the product gallery. This layout can be applied to the standard Carousel and to the Stack mode (in which each thumbnail will scroll the gallery to the referenced image).
Please note that the Vertical Nav elements are not within a carousel but are stacked below the other. So it is impossible to transform the list of thumbnails into a carousel in case you have a lot of images.
Links
TEST: from the Wireframes Plugin 1.5.0 it’s possible to test the new Single Product layouts from the category “Products“.
Product Attribute Image
Uncode version 2.7.0 introduces the new Attribute Image module. Thanks to this module, it is possible to display the image of any attribute on the Single Product page. For example, this module can help display the brand’s logo belonging to the product itself.
Attribute Image on the Single Product page
Let us give an example to understand its usefulness while explaining how to use it.
- Please create a ‘Brand’ attribute, screenshot ;
- Note the importance of the attribute being of type Image, screenshot ;
- Create a few terms for this attribute, including Apple (which will be the term we will use for this example), screenshot ;
- Insert an image as a thumbnail, screenshot ;
- Navigate to a single product editor, apply the Brand attribute and select the term Apple screenshot ;
Thanks to the use of the new Attribute Image module, it’s possible to display the thumbnail (with or without archive-related link). Please find here an example:
Attribute Image on the Posts module
Please note that the Posts module presents a new option to display this attribute image. In fact, once you select Products as Post Type, among the list of Elements, users have a new element, Attribute Image, thanks to which it is possible to display in the product thumbnail attribute image, screenshot ;
This methodology can be used to show Brands and any image (or more images), such as possible icons of hypothetical services.
Links
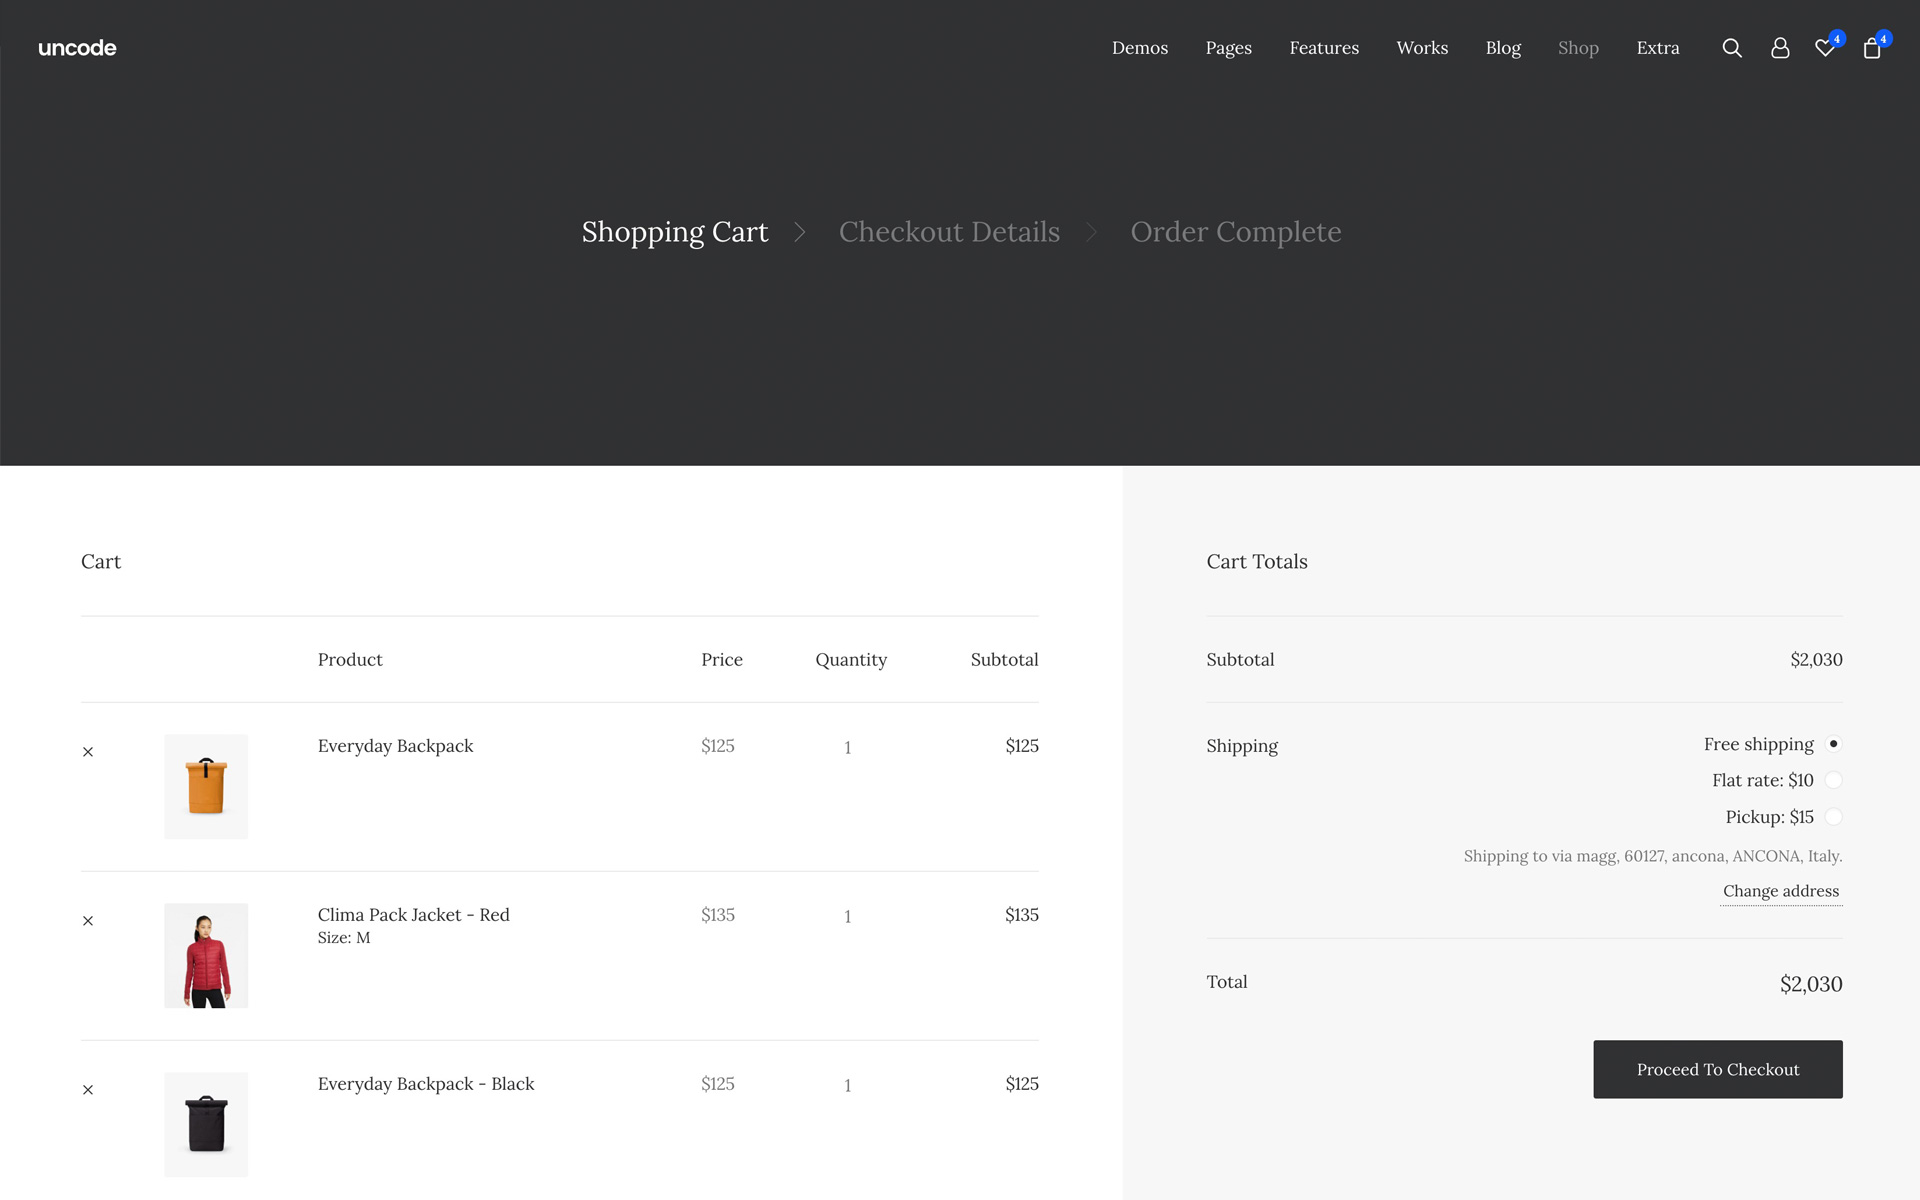
Cart and Checkout Steps
As of Uncode 2.7.0. you can use the new Checkout Steps module that enriches the shopping experience on the Cart and Checkout pages.
Thanks to this module it’s possible to create a better user experience by splitting the checkout process in several steps. Testing on checkout pages has shown that a multi-step layout is the best option for a better user experience during the purchase process. A multi-steps structure helps customers feel more comfortable during the payment as they understand which step of the process they are in.
Using the module is super easy; you just need to insert a Checkout Steps module into the header or the page contents of your Cart and Checkout pages and configure the options according to your needs and design.
Links
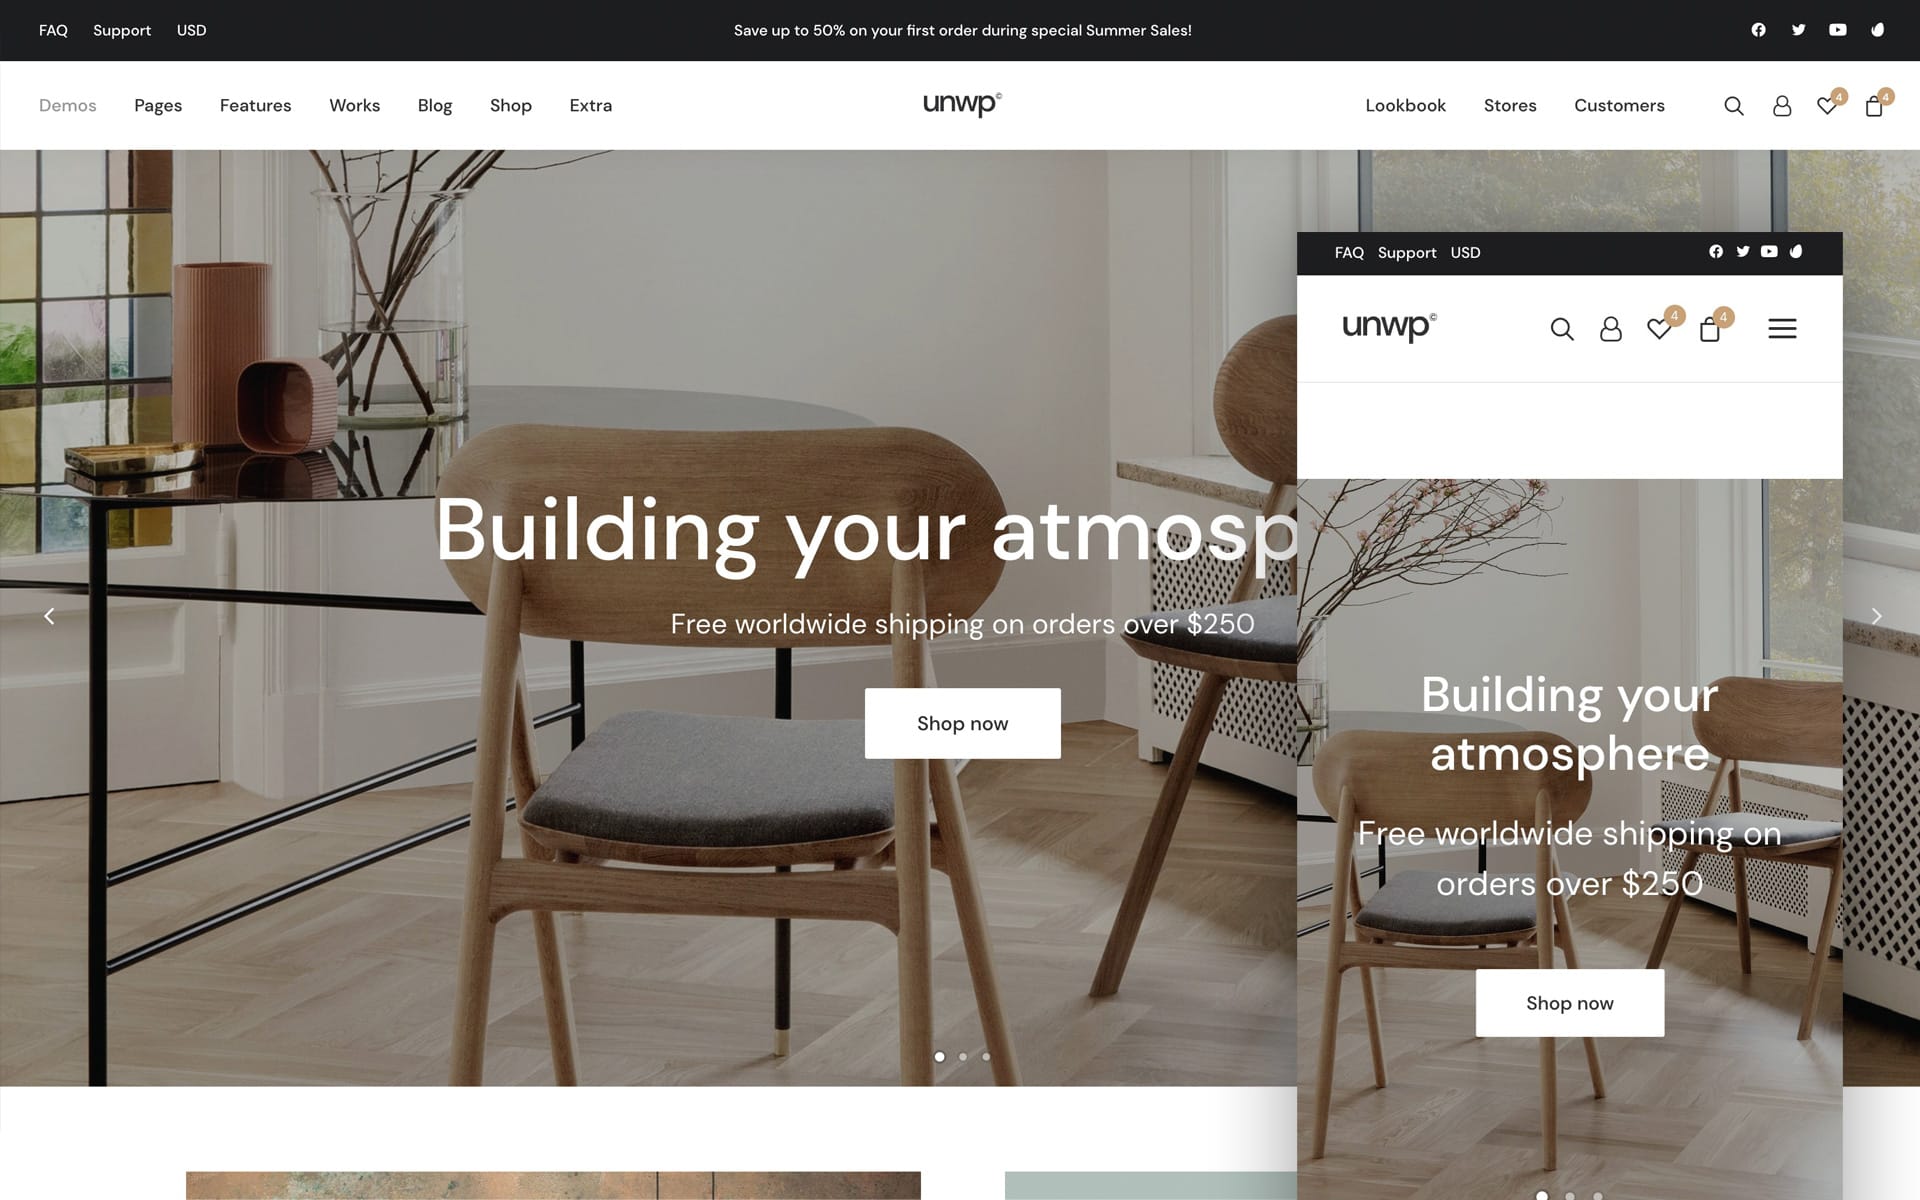
New Top-Bar
Uncode version 2.7.0 introduces renewed options for customizing the Top-Bar, which is placed, if needed, above the main Navbar. With these new options, users have more flexibility in creating their Navbars Menu.
Previously, the Top-Bar could insert only an additional Text and a Secondary Menu in fixed positions. Moreover, the Top-Bar was not visible on mobile unless to some custom CSS.
Now with the new options, it’s possible to have three elements (Text, Secondary Menu, and Social links) that can be placed independently in three different positions (left, center, and right). Moreover, it is now possible to show them on mobile devices and activate responsive options if necessary.
If you are updating an older version of Uncode, please activate the new options from the Core Settings, screenshot .
Please note that if you are using the old Top-Bar, when you activate the new Top-Bar option, you have to rebuild it using the new intuitive settings.
Once the new option is activated, the new Top-Bar settings group appears in Theme Options → Navbar → Top-Bar, screenshot ;
As anticipated, there are three elements that you can activate and place as you like:
- Top Line Text
- Secondary Menu
- Social Icons
Through the responsive Top-Bar option, you can place on Tablet or Mobile elements arranged in different positions on new lines; this is especially useful if you have numerous elements that exceed the available space.
To complete in Theme Options → Customise → Top-Bar, there is a new group of options that helps you to define Skin, Font-Family, Font Weight, and Font-Size, screenshot ;
Please note that on mobile, it’s possible to use only one dropdown level for the Secondary Menu.
Links
Search Dropdown layout
As of Uncode 2.7.0, it is possible to enable a new style for the main search located in the Navbar. In previous versions of Uncode, the search that opens from the main Menu was presented as a large overlay over the entire viewport window.
With the new option, you can have a minimal search that opens in a dropdown style for a less invasive and more user-friendly effect.
To activate the new layout, please navigate to Theme Options → Additionals → Search Icon → Search Dropdown, screenshot ;
Links

Padding Lateral Menu
Uncode version 2.7.0 introduces a new option named Lateral Padding. This new option allows you to add lateral padding to the Main Menu when it is Full-Width.
Thanks to this new option located in Theme Options → Navbar → Visuals → Padding Lateral, it’s possible to give more room to the Main Menu on fullscreen layouts.
This new option has the exact steps you find in the Uncode grid; thanks to this, designers can fine-tune the layout so that it perfectly follows the design of the page and its Responsive Breakpoints.
Links
How to update Uncode
There are three methods to update your theme: the easiest way is the Automatic Update which requires you to register your purchase, the Envato Market Plugin update method and the traditional method that involves more steps via WordPress or via FTP. Please find more info in the dedicated documentation:
Links
Change Log
2.7.0 (2022/09/14)
ADD:
- Ajax Filters
- Variation Swatches
- Additional Variation Images Gallery
- Filters with Grid layout
- Single Product Grid layout
- Single Product lateral thumbs navigation
- Ajax add to cart for variable products from the single product page
- Variations element for Posts Module
- Steps Checkout module
- Attribute Image module
- Attribute Image element (Posts Module)
- Ajax Filter module
- Ajax Active Filters module
- "Preloader" style for Load More in Posts Module
- typography option for the pagination (Posts Module)
- responsive option for the inline price element (Posts Module)
- Top-Bar Enhanced
- Search Dropdown
- Padded Menu
- Comment Module
- Scrolling tabs on mobile
- Mobile and Overlay Menu items animation
- Hooks for block data (Posts Module)
- Stock element for Posts Module
- Equal-Height for CSS Grid
- Wxtend hover Block option for Posts Module (extends the hover area)
- Taxonomy count can now be inline (Posts Module)
- Search template imporvements
- No products new main Search template options
- New wireframes

IMPROVEMENTS:
- Video lightbox from Icon Box module
- Accordion vertical rhythm
- Dropdown menu trigger with pen tablets
- Top padding mobile normalizer class (.normalise-top-padding-mobile)
- Avoid to trigger resize event when scrolling on Safari mobile
- Used RevSlider API to switch between nav bar skins
- WooCommerce product counter short version
- Improved checking of unclosed tags on Backend and Frontend Editor
- Collapsable widgets options and responsiveness
- Lightbox caption text escape
- Grid breakpoints
- NavBar vertical borders control
- New template for Posts Module when nothing is found
- Various fixes and improvements on Ajax related browser history events
- Single tab enabled for CSS Grid (re-order only)
- Posts title scaling on overlay layouts (Posts Module)
- New tab for styles in widget modules


FIX:
- Product Zoom on mobile
- Overlay Menu and Search bar z-index
- Message box animation
- Icon overlapping between CTA and Overlay menu
- StickyScroll position refresh
- Wishlist visibility on Frontend Editor
- Media Gallery Single Tab
- Icon Box text size
- Navbar background with Overlay menu open
- Lightgallery double trigger
- Dynamic featured and secondary images for taxonomies
- Lightbox from Quick View
- Product archive dynamic Single Media
- Redirect page conflict with First Row header option
- Share icons on Single Post with split CSS/JS
- Media Gallery lightbox deep link
- WooCommerce sorting inherits main dropdown menu options
- Image size on Icon Box Module
- Mobile Menu, in edge cases, pushed down content instead of overlapping
- Custom Post Type single post empty space
- Undo/Redo on Frontend Editor
- Fix for nav/prev Pagination link that were loosing the "post_type" parameter
- Fix incorrect product gallery layout when choosing "standard" from Page Options
- Fix calculation of the total number of posts with Pagination
- Fix sequential animation when using the Pagination of the Posts Module
- CSS fixes for Contact Form 7
- Fix "All" count in tax query (Posts Module)
- WooCommerce fix: exclude out of stock variations in Posts Module results

UPDATES:
- Uncode Core 2.7.0
- Revolution Slider 6.5.31
- Uncode Wireframes 1.5.0
- LayerSlider 7.3.0