
That mysterious little thing sometimes gives an unprofessional look to your blog or websites.
Moreover, none of us wants that, right?
Take a sip of coffee and come along this short journey if you want to learn how to remove uncategorized from WordPress menu. Besides that, we will also teach you how to change WordPress default category.
Why should I rename the uncategorized category? Is it that bad?
In this case, the cup is half-empty.
All jokes aside, it is not good. As we already mentioned, having the uncategorized category makes you look careless, and your blog will appear unprofessional to some visitors. Also, they will have a difficult time finding the content they are seeking.
Posts listed as “Uncategorized” will give off the impression that you forgot to classify it. Even if you purposely had put the post there, your visitors will not bother looking for it.
Defining the WordPress default category
When you install WordPress, the software sets up and uses some defaults – category, comment, post and so on.
Using categories and tags is a way to classify your content. Every WordPress post has to be filed under at least one category, so if you forgot to assign it to one, the software would automatically place it in the infamous “Uncategorized”.
Now, I know what you are thinking – I will use WordPress delete category button to solve this pesky problem. That is where it gets interesting. The trouble is, if you go to Posts > Categories, you will see that unlike other categories, the default one has no delete button.
What can we do now? Can WordPress hide uncategorized category? Well, there are two ways to solve this problem: rename the default category from “Uncategorized” to something more professional sounding, or set up a new default category.
New Uncategorized Name, New You
As we sighed after seeing that there is no way to delete a default category, we will have to try WordPress change category name option. Let us have a look at how we can edit categories in WordPress. Go to Categories page under Post menu in your dashboard and click edit on the Uncategorized category.
That will open up the Edit Category page where you can change the name, slug (which is the URL-friendly name), parent category and description. Roll up your sleeves and rename the category, update the slug to match the new name, and that is it.
Every time you write a new post, it will appear in this category unless you choose otherwise.
Now, a quick tip: You can change your URL freely if your website is not live or indexed by search engines. If it is live, up and running, it will result in 404 errors when anything attempts to visit the old URL. So, be careful!
Setting up new WordPress default category
Renaming the category is great if you have a new website or blog with not that much content. Trouble is when you decide to rename the uncategorized category on a really old website with many post categories. Let’s see how you can choose one of them as a new default category.
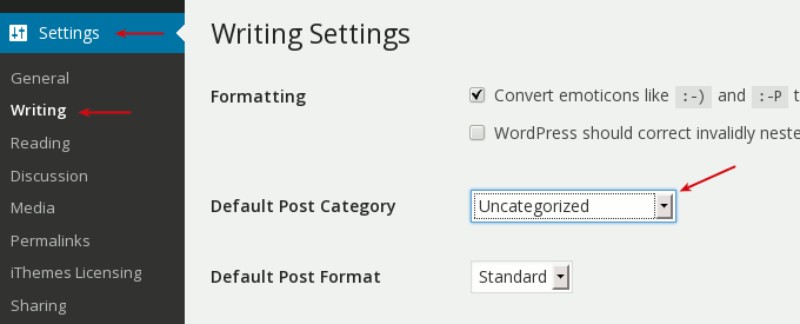
Go to your WordPress dashboard menu and find Writing page under Settings.
There you can see the “Default Post Category” drop-down menu. Now choose a category that best describes your posts. Save changes, and voila! Every new post will automatically be assigned to the selected category.
How to delete categories in WordPress?
If you decided to set up a new default category, you could now delete “Uncategorized” one. Don’t worry if you still have your old posts assigned to it – removing “Uncategorized” category will change all of the old posts category to the default one you just set.
Here’s how to remove categories in WordPress. Go to Categories under Posts menu, hover over the “Uncategorized” category and click Delete button.
You can choose to leave it as it is, but keep in mind that all of your old posts will still be in that category.
How to redirect old Uncategorized URL?

So you skipped our tip where we talked about how changing slug (URL) of your live website can cause 404 errors? We do not judge.
If you are getting 404 page errors, here is what happened. You renamed the infamous uncategorized category URL, or you deleted the category while your site was live. Visitors and search engines will see a 404 page for the old slug.
Fixing this is quite easy. Find, download, install and activate the Simple 301 Redirect plugin. If you need any help with setting the plugin up, check out our step-by-step guide.
After the activation, go to 301 Redirects page under Settings menu, and enter your old uncategorized slug (URL) in the “Request” field, and write your new URL into the “Destination” field.
If your old URL was “http://helpmeuncagetogize.com/category/uncategorized/”, then you must enter “/category/Uncategorized/” in the Request field.
In the destination, you must always enter the full new URL! For example, if your new category slug is “WordPress master”, then you should add “http://helpmeuncagetogize.com/category/wordpressmaster” in the field.
Save changes, and that is it.
Ending thoughts on how to rename the uncategorized category
Think of it like this: You are looking for a kettle in your local shop, but after walking around cluelessly for a couple of minutes you either give up or approach the staff – and they say that you can look for it on a giant pile of items labelled as “other”. Quite annoying, isn’t it?
As you can see, it does not take more than ten minutes to rename the Uncategorized category. It is not too much of a hassle, but the results can be game-changing. Correctly categorizing your content will undoubtedly leave a positive impression on your websites’ visitors.
And we hope that this article helped you do just that!