
Moving your WordPress website to a new host might seem daunting, but sometimes, you may have no better option. Many webmasters choose to migrate their websites to address important concerns, such as poor performance and lackluster customer service from their providers.
Fortunately, migrating a WordPress website – including your database and general content – is not nearly as complicated as it sounds. With a bit of preparation, you’ll be able to mitigate the risk of losing important data or facing a prolonged downtime. Furthermore, some WordPress-friendly hosting providers even offer free migration services, in case you don’t want to deal with the process yourself.
In this guide, we’ll be taking a look at some of the main reasons why you’d want to migrate your WordPress website, and then we’ll teach you how to do it safely. Let’s jump right in!
4 Reasons Why You’d Want to Migrate Your WordPress Website
Migrating your WordPress website to a new host is a major decision that can affect your business on multiple levels. As such, it’s not one that you should take lightly. However, there are several solid reasons for considering it, and we’re going to discuss each of them below.
1. Performance Problems
How long your website takes to load is one of the biggest factors contributing to increased bounce rates. Given the short attention spans of web users, page abandonment rates tend to skyrocket with every extra second they’re forced to wait around for websites to render.
Although there are multiple factors that govern website performance, your choice of web hosting provider is one of the main ones. If your web host uses outdated hardware or has you sharing resources with too many other sites, then it’s probably time to consider moving.
2. Server Stability
There’s only one thing worse than a slow website, and that’s having one that refuses to work at all. If visitors are coming to your website only to be greeted with an error page, some of them may never return.
Prolonged downtime and server instability are a sure sign of a poor web host. In most cases, these types of errors are caused by poor maintenance on their end, which is definitely a good reason to consider alternative hosting providers.
3. Poor Customer Support
Inadequate customer support is perhaps the most compelling reason of all to migrate to a new hosting company. After all, when you’re running a business, every second counts, and you don’t want to be stuck for hours waiting for an agent to get back to you with a generic response.
Many hosting companies – particularly those that cater to consumers rather than businesses – leave a lot to be desired when it comes to the quality of their support. If you’re in the market for a better alternative (which you should be), keep an eye out for quick response times and a knowledgeable support team.
4. Inadequate Security
Online attacks happen all the time. They’re something that every hosting company has to deal with, and how they respond to these occurrences is key to determining whether they’re worthy of your patronage.
At best, security breaches – such as DDoS attacks – can lead to slow performance or downtimes. At worst, they can result in your clients’ private or financial information ending up in the wrong hands. When choosing a hosting company to migrate to, you should definitely opt for one that takes security seriously.
How to Migrate Your WordPress Website to a New Host (In 7 Steps)
Migrating your WordPress website to a new host doesn’t have to be a stressful experience. If you do it properly, you’ll be able to minimize downtime and ensure that everything goes smoothly. In fact, we’d go as far as to say there are very few instances where paying someone to do it for you might be worth it, especially when so many hosting providers are willing to do it for free.
Before we jump in, you’ll need to pick a suitable WordPress web host and sign up for its services. Once you’ve done that, you’re ready for step number one.
Step #1: Back Up Your Website
First of all, you’ll need to back up your current WordPress website in case anything goes wrong. The easiest way to do this is by using a plugin, such as WPBackItUp, which is the one we’ll be using in this section. If you’d like to check out other alternatives before committing, here’s a good place to start. Once you’ve chosen a plugin, install and activate it as you would any other.
Moving on. If you’re using WPBackItUp, find its corresponding tab on the WordPress dashboard and click on it. On the next screen, go ahead and select the Backup option to get the process underway:

This might take a while depending on how large your website is, so sit back and enjoy your coffee while the plugin does its work. When the backup is complete, the plugin will list it alongside any other snapshots of your site you’ve taken beforehand. Clicking on any of these will enable you to download the corresponding backup to your computer. Do so now and keep that file somewhere you won’t forget about it – we’ll need it in a bit.
Step #2: Export Your WordPress Database
This step assumes that your host provides you with access to the phpMyAdmin application (and most of them do). To export your database, you will need to log in to your hosting account’s control panel and open the phpMyAdmin tool, then enter your login details.
Now select the database you want to export from the list to the left. Its name should be something along the lines of wp or wordpress. If in doubt, you can always contact your hosting provider’s support to help you find the right one.
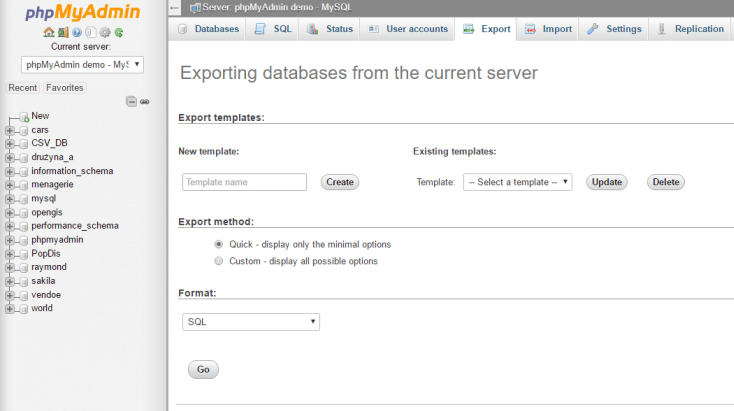
Once you’ve identified and selected the correct database, its contents should appear to the right under the Structure tab. Select the Export option, choose the Quick export method, and pick SQL as your format, then click Go. At this point, you’ll be prompted to download the database – keep it somewhere you’ll be able to find it, just as with your WordPress backup.
Step #3: Create a WordPress Database in Your New Hosting Environment
If you are moving to a hosting provider that comes with WordPress pre-installed, you can safely skip this step since you should already have a database in place. If that’s not the case, you’ll need to create a new one before you can proceed with the migration, so that you can import the database you just downloaded.
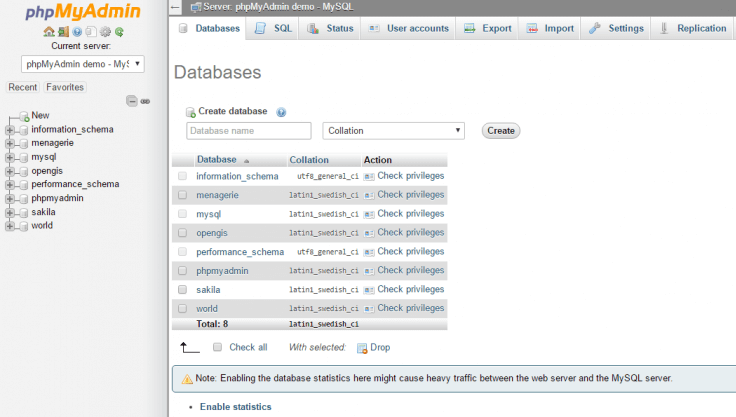
To do this, you’ll have access the phpMyAdmin tool as you did in the previous step. Open the Databases tab, enter a name in the Create database field, and click on the Create button:
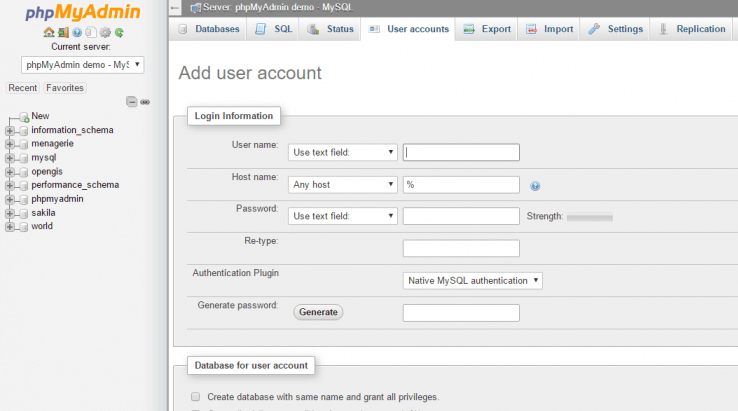
Next, you’ll need to set up a user profile for your new database. Click on the Users tab and select the Add user option. Now pick a username that you will remember and choose a secure password. Keep in mind these will be the same details that you’ll use to log into WordPress once the process is complete, so don’t settle for generic credentials. Leave the default settings for the rest of the options available and click on the Go button to proceed:
With that out of the way, it’s time to tinker with one of WordPress’ most famous core files.
Step #4: Update Your wp-config.php File
wp-config.php is one of WordPress’ most important files as it contains essential information about your database. For your migration to work, you’ll need to modify your wp-config.php file to include the settings you specified during step number three – your database’s name, your username, and your password. If you skipped that step, you can retrieve the necessary information by logging into your phpMyAdmin account.
To get started, find the file that you downloaded during step one and extract its contents. Now, locate the wp-config.php file, which should be stored in the root directory. Open the file using your favorite text editor and update the following lines with your own information:
define('DB_NAME', 'Your_database_name');

define('DB_USER', 'Your_username');

define('DB_PASSWORD', 'Your_database_password');
Save the changes and close the file, we’re ready to import our new database now.
Step #5: Import Your WordPress Database to Your New Host
Now that you have a new database to work with, you can go ahead and import the data from the old one. Again, this step assumes that you’re using the phpMyAdmin application, which is accessible through your hosting account’s cPanel.
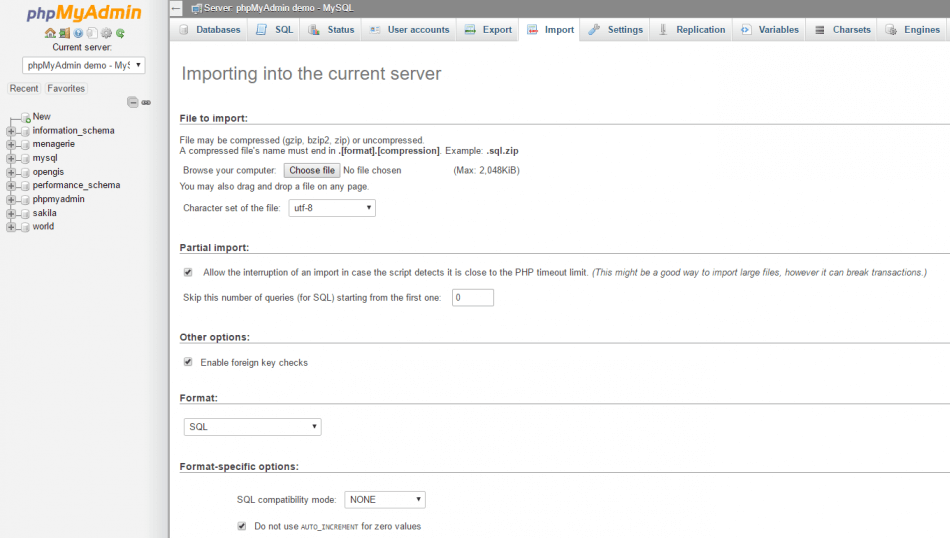
Open phpMyAdmin and click on the Import tab. Under the File to Import section choose the SQL file that you downloaded during step number two. Ensure that the box beside the Partial Import option is deselected and that the chosen format is set as SQL, then click on Go to start the process:
This could take a while, depending on the size of your website, so finish that cup of coffee you started during step number one – we don’t have long to go now.
Step #6: Upload Your WordPress Content to Your New Host
Now that you’ve imported your database and updated your wp-config.php file, it’s time to upload the rest of your WordPress content. To do that, you’ll need to use an FTP client, such as FileZilla.
Open your FTP client and connect to your web host, then navigate to the location where you want to install WordPress. If you’re only planning to set up one website on your new server, your WordPress files should go in the public_html folder.
Once you’ve found the right directory, upload all the files you extracted during step number four. As you might expect, this process will take a while depending on your upload speed, so be patient while it finishes. When it’s done, your WordPress website will be up and (almost) ready to go!
Step #7: Put the Finishing Touches in Place
Now that the move is complete, there are a couple of finishing touches we need to put in place before calling it a day. More specifically, we need to make sure there aren’t any issues with broken internal links (in case you changed domains) or your DNS settings.
To make your website fully accessible, you’ll need to update your DNS settings so that they point towards your new host. It can take up to two days for these changes to propagate, during which you may want to keep your old website up. If on the other hand you decided to change domains, you’ll need to make sure all your internal links are working using a plugin such as Search & Replace. This straightforward tool will go through your entire website and replace any broken internal links (staying true to its name) so that your visitors won’t run into them.
Conclusion
Migrating your WordPress website to a new host can be a daunting task, but sometimes, it’s the only way to attain a better experience. If you find yourself facing constant performance issues, bad customer support, and even security woes, a migration is definitely the way to go.
In this post, we’ve provided you with a step-by-step guide for making your WordPress migration as easy as possible. Let’s review them before wrapping up:
- Back up your website.
- Export your database.
- Create a database on your new hosting provider.
- Update your wp-config.php file.
- Import your database into your new web host.
- Upload your WordPress content to your new home.
- Fix broken links and reconfigure your DNS settings if necessary.
Have you ever had to migrate your WordPress website to a new host? Tell us about your experience in the comments section below!
Image credits: Pixabay.