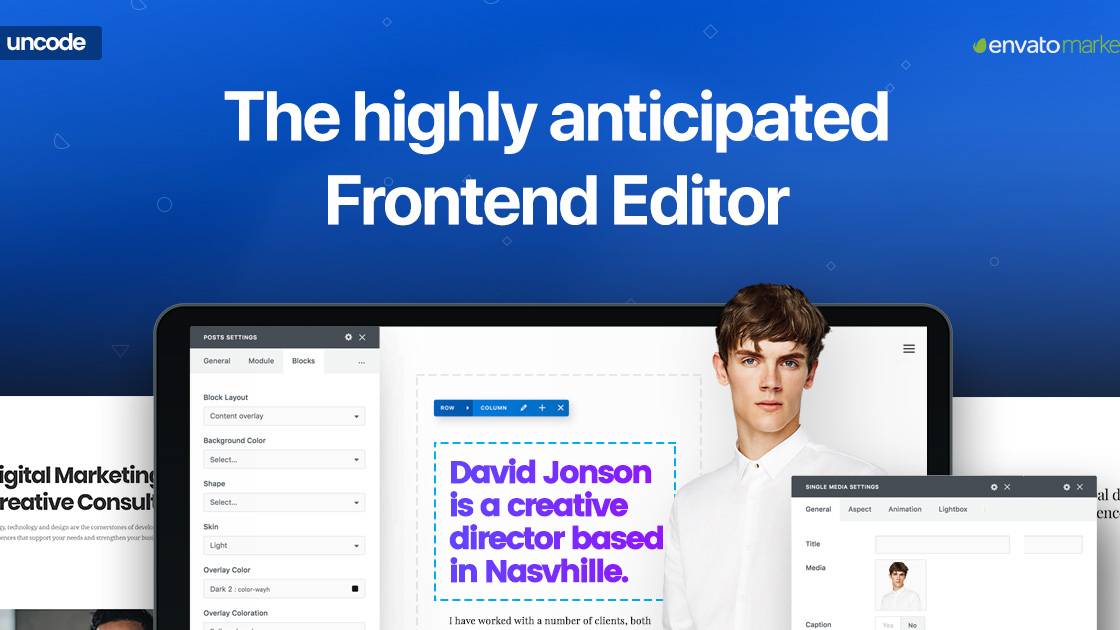
We are pleased to bring you Uncode 2.2 the latest and greatest version of our pixel-perfect, creative, multipurpose WordPress theme. Uncode 2.2 arrives with the new Frontend Editor that allows you to edit your pages on the frontend! It’s an amazing experience and allows for much faster design. Let’s explore…
Frontend Editor
The Frontend Editor, introduced from Uncode 2.2, is the new builder that many have been waiting for. With the Frontend Editor, you edit your content directly on the frontend of your website. You can see your layout as you build it, and you can preview exactly your design. Creating pages with the new Frontend Editor is very similar to the Backend method. The same Controls are available to add Rows, Columns and Elements, and the only real difference is the workspace.

Toolbar
Within the new Frontend Editor, we have designed an unobtrusive workspace that stays out of the page as much as possible. This minimalist approach allows you to see your content and layout clearly, while still giving you access to the tools you need. The only things that really differentiates it from a frontend page is the Toolbar along the top, and the few icons at the end of the content to add new items. Note that you can also have the toolbar in a compact vertical layout that completely free your stage and design.
The Toolbar provides access to many building tools. Let’s have a look at the Toolbar’s components:
- Add: this icon allows you to add a new Row or Element (Posts, Heading, Text, etc…).
- Layouts: this accesses the Wireframe plugin library (if active) and the Template library.
- Minimize: modify the Toolbar from horizontal to compact vertical layout.
- Focus: activate the ‘Safe Mode’ for a simply editing experience.
- Arrows: these shows the history states, allowing you to step backward throughout your actions.
- Gear: here you can access the page Custom CSS.
- Displays: here you can preview the page in desktop, tablet and phone responsive mode.
- Exit: this exists the Frontend Editor and takes you to the frontend page.
- Backend: this closes the Frontend Editor and takes you back to the Backend Editor.
- Update: the Update button allows you to save all the work done in the Frontend Editor.
Controls
When you are in the Frontend Editor, it’s when you mouse over a content area (over a Column) that you see the relative Grid structure, the Rows and Columns Controls and the Elements Controls.
Rows and Columns Controls work together, are grouped together and are positioned at the beginning of each Column. To reach the Row Controls you have to over the contents that are part of that Row, in a nutshell the contents of the Column. For ease of use, the Row controls are repeated along with the controls of each Column. You can switch between the Row and Column Controls by expanding them with a simple click on the small arrow icon (caret). These are the major controls you have available in the Frontend Editor:
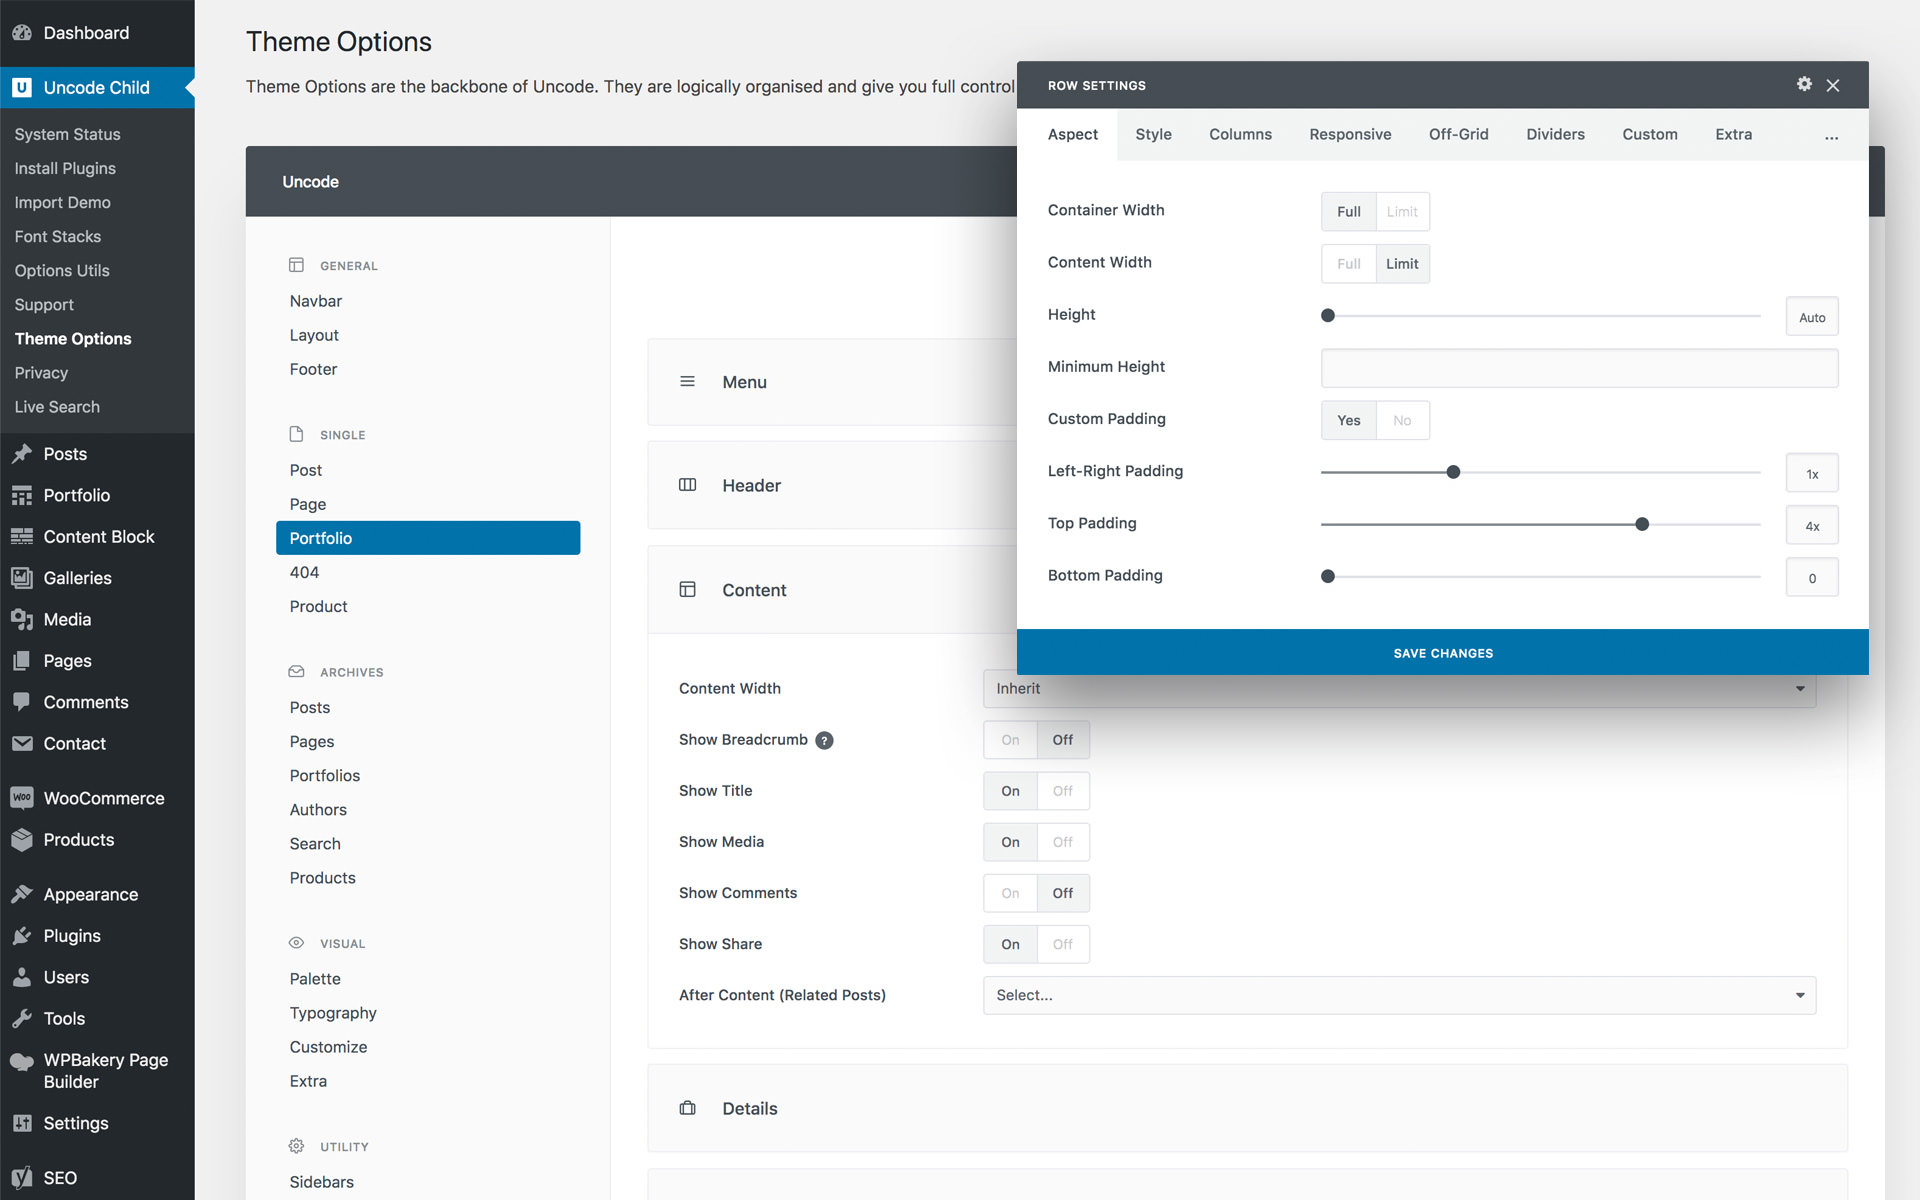
- Row: illustrated with a Dark Blue colour, allows you to edit the settings or drag the Row;
- Column: illustrated with a Mid Blue colour, allows you to edit the settings or drag the Column;
- Element: illustrated with a Light Blue colour, allows you to edit the settings or drag the Element;
- Add: only visible in an empty Column, allows you to add a new Element;
Settings and Options
When you over a Column or an Element, Controls appear to show the full range of options for that item. The majority of these Controls are similar, although there are a few specific to the item:
- Name: by pressing the name turns the cursor into the drag icon and it’s used to drag the Element.
- Settings: the pen icon opens the Settings where you can then configure the options.
- Layout (only for Rows): the lines icon opens the Row Layout where you can change the number of Columns.
- Clone (not for Columns): this duplicates the Element, which is then added below the Element cloned.
- Add (only for Columns): this opens the Add Element dialog, where you can add any of the Elements.
- Remove: this deletes the chosen Element from the layout.
Drag Elements
To drag a Row, a Column or an Element you just have to place the mouse over the name. You see the mouse pointer become the drag icon, at this point you can drag the element to another position among those available for that Element.
Row Z-index
When you’re over on a Row this Row will automatically have a z-index greater than all others: a Row with greater stack order is always in front of a Row with a lower stack order. This is only visible if you have Off-Grid elements and allows you to reach the Controls that in some may remain hidden.
Content Blocks
The Content Block is a unique Uncode feature. This feature gives the website designer the ability to use Uncode WPBakery Page Builder to create and store sections of content that can then be integrated into other pages and used across the site. Content Blocks are widely used for creating headers and footers.
When you over a header or a footer you see a Control similar to the Element Controls. When you click on these Controls you will be redirected to the Frontend Editor of the specific Content Block. Please note that the linkage between a page and its Content Blocks is made via the Theme Options (general) or Page Options (single page).
Safe Mode
This visualization mode is activated by the Focus icon placed in the main Toolbar and aims to simplify the editing of the page in certain critical situations or if the user prefers a more schematic view of the grid, the dimensions and all the elements inserted.
When this mode is active all the controls present and all the grids are visible, the off-grid elements are reset, the elements hidden by the responsive options become semi-transparent and additional spaces are added to simplify editing in the presence of Inner Rows.
Page elements
There are areas of the page that are not directly editable in the Frontend Editor, as their content is generated in the Theme Options, in the Page Options or other areas of WordPress. In a nutshell, the contents are not generated with the Page Builder and for this reason it is not editable with the Frontend Editor. These are areas like the Breadcrumb, the Sidebars, the Comments, etc…
Specifications and exceptions
To make the Frontend Editor faster and more usable, there are some non-essential features that have been disabled, please take note of them. However, these small differences are also indicated in the option description:
- Slides Scroll: to allow effective editing of the layout, the Slides Scroll features are completely disabled.
- Scroll Snap: to allow effective editing of the layout, the Scroll Snap features are completely disabled.
- Autoplay: the autoplay option of the carousels (both Posts, Media Gallery and Content Slider) is disabled.
- Loop: the loop option of the Content Carousel is disabled.
- Content Block VC: the Content Block with Column Container Settings set to Yes is disabled.
- VC Particles: this plugin is not designed for the Frontend Editor and cannot therefore be viewed and edited.
- VC Clipboard: this plugin is not designed for the Frontend Editor.
- Mobile Menu: the layout of the mobile menu doesn’t cover the window height in the Frontend Editor.
- Column Link: links applied to columns are removed in the Frontend Editor.
Element hidden behind the Controls
The Inner Row and Inner Column Controls are internal to the Column itself. In rare cases, specify when you have a very small Element this could remain hidden under these Controls making it impossible to drag or open the settings. If this happens, our advice is to momentarily insert another Element in the Column (such as a Text Block) and to drag it to the first position so that the Element to be edited is pushed down. Another solution is to activate the Safe Mode.
Keyboard Shortcuts
There are a few useful shortcuts that can speed up your workflow in the Frontend Builder. Don’t underestimate the power of these shortcuts, when used during the design workflow they can make a big difference:
- alt + s: save the actual options window.
- alt + w: close the actual options window.
- alt + d: change tab forward.
- alt + a: change tab backward.
Refined and improved UI
Uncode 2.2 comes with an entirely refined, and improved admin user interface. All elements, and admin pages have been redesigned to detail and visually optimized for consistency. Discover a whole new Uncode that you will love.
Native Related Posts
For a faster and more powerful setup, without the need to install extra plugins, we introduce the native Uncode Related Posts feature. Related Posts increase page views and reduce bounce rate. This is an effective way of getting more views. The new method does not need any particular set-up, you just need to associate a Content Block and activate the Automatic Query option of the Posts module. Additionally, if you want to have more control and more options for the Related Posts you can contine to use the Related Posts for WordPress plugin that was aleady packed in previous versions.
ShortPixel support
Uncode 2.2 introduces support for ShortPixel, the popular image optimization plugin. ShortPixel improves performance by reducing the Uncode’s Adaptive Images size even more: resulted in smaller images that are no different in quality. If you optimize your images with ShortPixel, please activate the new option Theme Options → Performance → Register Metadata available from Uncode 2.2. After activating this option, we recommend that you delete the Adaptive Images that have been created, using the command Theme Options → Performance → Delete all AI Images. In this way, they will be regenerated again with the Metadata useful for the operation of the ShortPixel plugin.
Slider Revolution 6
The new version of Uncode is packed with Slider Revolution 6: a new way to build rich & dynamic headers for your websites. With the powerful visual editor, you can create modern designs in no time, and with no coding experience required. The control for insert the Skins codes is moved in the Slide Options → Tags & Link → HTML Data.
Important Notes
Removed Plugins
To make Uncode more organized, and suitable for the needs of all users from version Uncode 2.2, we removed from the Required Plugins, some minor add-ons which are used for secondary purposes. These plugins are:
- VC Particles Background – this plugin generated a ‘particle.js’ backgrounds for Visual Composer Rows.
- Dave’s WordPress Live Search – adds ‘live search’ functionality to your WordPress site.
- Related Posts for WordPress – the best way to display related posts in WordPress.
Note that these plugins will continue to be updated for all users in subsequent updates of Uncode and they will continue to be included in the main download of Uncode files from ThemeForest.
Textual Carousels
If you upgraded to Uncode 2.2, depending on the layout and settings, the Testimonials and Quote Carousels can be not aligned plus inserted in a full-width section not respecting the limit width.
Unfortunately, in Uncode 2.2 we fixed an old problem that limited the possible layouts when using textual carousels such as the Testimonials or Quote.
To correct the error, you may have at the moment, please follow:
- Open the Media Gallery → Block tab → Text Alignment need to be set to Center.
- If the Textual Carousel is too large, open the Row → Aspect tab → Content Width need to be set to Limit.
We apologize for the inconvenience due to this old bug that limited many layouts now possible and that as a side effect has the modification of old designs already created.
Options Moved/Renamed
In the reorganization of the admin, some options have had minimal name changes and adjustments.
Other options have been moved, among them the most important to remember is the removal of the Inner Column tab within the Columns and Inner Columns options. The only option that was contained in the old Inner Column tab is now moved to the Aspect tab and is renamed Vertical Spacing.
- Old version: Column (and Inner Column) > Inner elements > Vertical gap;
- New version: Column (and Inner Column) > Aspect > Vertical Spacing.
How to update Uncode
The easiest way to upgrade your version of Uncode is to activate the automatic theme updat. If you don’t know how to do this, instructions are available in our documentation. You can also update manually if you prefer. Please remember to update both the theme and the incorporated plugins, such as Uncode Core and Uncode Page Builder (Visual Composer).
How to get Support
If you need help with the theme update, or if you have discovered an issue, we offer comprehensive support in our Help Center. We have a completely dedicated and highly-qualified support team ready to help you out. Please drop us a line, and we’ll get back to you with a solution as soon as possible.
Need a new License?
If your support period has expired and you need to renew your license, please choose one of the following options:
Renew your support period. To reactivate your support, log in to your ThemeForest marketplace account, navigate to the Uncode WordPress Theme page, and choose one of the renewal options.
Buy a new license. If you plan to build more websites with Uncode, it is more cost-effective to purchase an additional license (which will include support) rather than extend the first license.
Do you have any suggestions?
Thanks for taking the time to read about our latest update! If you have any suggestions for new features you’d like to see in future versions of Uncode, we’d love to hear your ideas!
Change Log
Uncode is constantly being updated with new features, bug fixes, and adjustments. Here is a full listing of change log information.
Beta Testers
As a final note, we’d like to thank all of the beta testers who actively participated in debugging and getting this new version of Uncode ready. If you want to become a beta tester for Uncode, please follow the link below.
The Undsgn Newsletter
Sign up to stay up to date with the latest news!
(You will be forwarded to our subscribe form hosted by Mailchimp)
Introducing Uncode version 1.5.0. The most anticipated update!
We are pleased to bring you Uncode 1.5 – the newest and best version…

Introducing the Uncode 2.0 New Details Make Pixel Perfection
We are pleased to bring you Uncode 2.0 the latest and greatest…
Introducing the Website Wireframes Plugin for Uncode
The Wireframes Plugin, bundled from Uncode version 2.1, allows you to…