First of all, you need to know which IP address to block, and you can find that address by using server logs. It shows all the IPs that are trying to access your dashboard at a specific time. You should thoroughly inspect any suspicious or unauthorized activity.
Welcome to the crash-course of IP blocking!
In this text, we will teach you how to block an IP address in WordPress, and show you where to find you IP blacklist.
However, before we get technical, we have to cover the basics.
What is an IP address?

An IP address represents four sets of numbers from 0 to 255 separated by dots, but what does that mean? If the internet is a digital planet, an IP address defines a country, street, and house number. It looks like this:
192.168.0.1
So, every computer that visits your website has its IP address stored in your website’s access log. Do note that you can conceal this information by using a VPN service which allows you to hide your computer’s IP.
Because of it, sometimes it’s tricky to block an IP address from your website.
When should I ban IP addresses?
What are the activities that say “Hey, ban my IP”? The usual suspects for IP ban are a comment and email spams, hacking attempts, suspicious and unwanted visitors, and denial of service attacks (also known as DDOS).
The first three examples are easy to spot: cluttered inbox from your contact form, a plethora of gibberish comments, but the last one is not as obvious. Telltale signs are frequent inaccessibility to one or all pages of your website or long page loading times.
Showing a user’s IP address in WordPress
Let’s hit a pause on IP blocking for a moment and have a look at the usefulness of getting and displaying a user’s IP address.
This feature has a lot of practical uses, such as if you are presenting code snippets where a user has to enter their IP address in it, you could use this technique to show the visitors their addresses without them having to figure out themselves.
You also might be giving instruction where the visitors need to enter their IP address as a part of the instruction, which, again, makes it simple for them to find their IP address. But to avoid coding, you can install a free, lightweight plugin called “Show IP address“, and here’s how to use it:
Step 1: Install and activate the plugin
Type “Show IP address” on your dashboard and install the plugin developed by Keith Griffiths.
Step 2: Use the shortcode
Once the plugin is activated, use the [show_ip] shortcode to show a user’s IP address. It’s up to you if you want to insert this shortcode in the WordPress Editor or a code module in the Divi Builder.
Where to look for IP addresses of suspicious visitors
If you already have the IP addresses you want to ban, feel free to skip ahead to the next section.
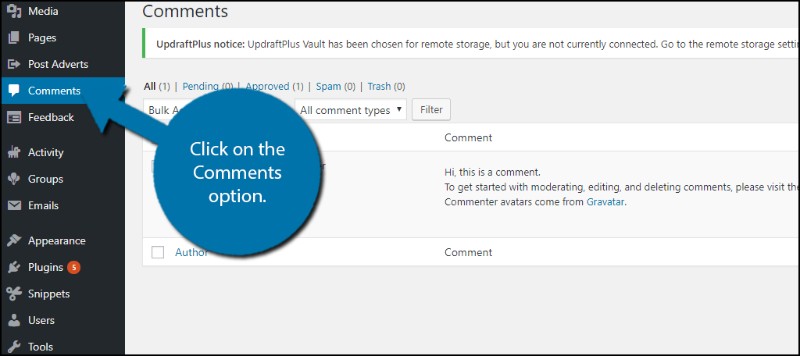
First, let’s take a look at the most straightforward problem – the comment spam. In this case, finding the spammers IP address is irrelevant because WordPress gives you that information for every single comment entry. Check out your “Comments” tab to see it. After that, it’s time to block an IP address!
Finding the IP addresses of other bad boys is more complicated because if you do not have an activity monitoring plugin, you will have to dive into your website host’s logs.
It sounds complicated, but it is not – you just have to download the traffic log of your website (or websites if you host several of them), then using WinZip or WinRar, open the .gz log file. After that, open the data that’s inside it with a Notepad or any other text editor.
With the text opened, look for anyone who accessed a specific page on your site (either by scrolling or using “Ctrl+F”).
You can even check if someone has tried to access your site’s admin area by searching for “wp-admin” or “wp-login”.
How to use .htaccess to ban a single IP address?
We cannot write on how to IP ban someone from your website without mentioning the .htaccess file. It is a fantastic and simple way if you look to block an IP address from accessing your WordPress. As an example, add the text below to your .htaccess file in the root of your website:
order allow,deny

deny from 192.168.1.2

allow from all
What does this mean? These lines will deny access to the following IP address: 192.168.1.2. If you want to ban more IP addresses, just add them to the new lines using the already written syntax (deny from [IP Address]).
For example, let’s ban IP addresses: 192.168.1.2, 10.130.130.6 and 172.16.130.106. The text should look like this:
order allow,deny

deny from 192.168.1.2

deny from 10.130.130.6

deny from 172.16.130.106

allow from all
That is how you can use .htaccess to block IP, but be careful and double-check the addresses, so you don’t lock out your wp IP.
How to use .htaccess file to deny several IP addresses?
Another great thing you can do with .htaccess is to ban IP addresses, let’s say from 192.168.1 to 192.168.1.199, using the lines below:
order allow,deny

deny from 192.168.1./199

allow from all
How to use .htaccess file to ban a hostname or an ISP
It is possible to ban a user, a group of users or even an ISP by using hostnames in the .htaccess file. If an ISP’s hostname is hackattack.org, you can use the lines below to block it:
order allow, deny

deny from weirdsite.com

allow from all
How to blacklist an IP address using cPanel?
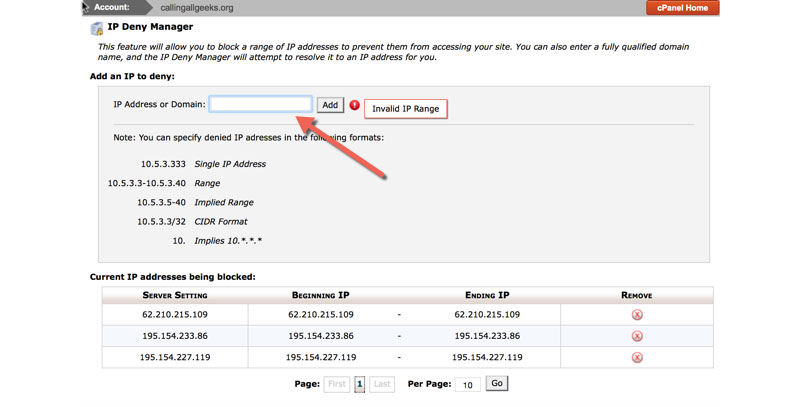
Another excellent WordPress IP blocker is the cPanel. This method is excellent for preventing hacking attempts and DDOS attacks.
First, log in to the cPanel on your WordPress account and scroll down to security section, then click on “IP Blocker” which will lead you to the IP address Deny Manager tool. Once there, you just have to type in the IP addresses you wish to ban.
After checking the IP addresses, click on “Add button”, and voila, that is how you can use WordPress to block IP. Also, in the same way, you can use this cPanel feature in WordPress to unblock IP.
Ending thoughts on how to block an IP address:
After this short read and using the suggested plugins, you are more than prepared to secure your WordPress website form any suspicious visitors or to show users their IP addresses.
While blocking is a go-to solution to prevent any questionable IPs, it doesn’t mean that the address will stay the same, meaning that if you block someone, they can come back with a new IP address.
Because of that, using options inside your WordPress dashboard might be an easy solution so you can ban problematic IP addresses as soon as they pop up. Stay safe!