
A WordPress localhost setup is much more secure as it offers you a personal and private playground, away from any potential threats. Not only that, your website will run much more quickly than if you host it online.
Now buckle up and enjoy this short XAMPP tutorial that will teach you how to run WordPress locally.
What exactly is XAMPP?

XAMPP is an abbreviation for cross-platform, Apache, MySQL, PHP and Perl, and it allows you to build WordPress site offline, on a local web server on your computer. This simple and lightweight solution works on Windows, Linux, and Mac – hence the “cross-platform” part.
Since WordPress isn’t a stand-alone application, XAMPP provides two essential components for its installation – Apache, which is used to create the local server, and MySQL which you can use as a database for your website.
You may be wondering why and how developers are using WordPress local server. The answer is simple – it allows them to create a local copy of the site in which they can try out new plugin updates before implementing them on its live version.
This way they can prevent and spot potential errors and issues that might occur.
Now it’s time to dive deeper into this XAMPP tutorial and learn how to locally host a website on Windows, Mac, or Linux.
Step One: How to install XAMPP?
The first step in setting up XAMPP: go to the Apache Friends website and download the file for the platform you are using. You will see separate download links for Windows, Linux and OS X. Note that there is no 64-bit version for Windows, but the 32-bit one works perfectly fine.
The file size is not that large (around 110MB).
After downloading it, launch the installer and XAMPP setup will begin.
Step Two: Initial Installation Steps
Sometimes, depending on your operating system, you may receive a security warning. Don’t worry, XAMPP is safe to install. When setup wizard pops up, click “Next”, and in the next window, you will be asked to select components you want to install.
Options like Apache and PHP are required and are installed automatically. Since our goal is to host WordPress locally, you must check MySQL and phpMyAdmin boxes. You can uncheck the rest if you want to.
Next, select the folder where you would like to install XAMPP on your computer. It’s up to you if you want to create a new folder or use the default path (C:\Program Files\XAMPP).
After choosing the install directory, you will be asked to install Bitnami. The extension makes installing third-party CMS programs WordPress, Joomla!, Drupal without a hassle. In this XAMPP tutorial we will manually install WordPress, so uncheck “Learn more about Bitnami for XAMPP” and click “Next”.
Step Three: XAMPP Setup

Finally, after going through all those installation hassles, XAMPP is ready to install. But, wait, there’s more! During the installation, you may encounter security/firewall warnings. Make sure you check “Private networks, such as my home or work network”, and click “Allow Access”.
That will create a rule for XAMPP in your security system, and allow it to work. Now, where were we? Ah, yes!
After the installation, you will be asked if you would like to start the XAMPP Control Panel. Leave the box checked and click “Finish”. The Control Panel will now open.
Step Four: Running XAMPP
If you accidentally unchecked the box, don’t worry. You can go to your XAMPP folder on your computer and manually run XAMPP Control Panel.
Note: Before using XAMPP, check that you don’t have conflicting applications that are using the same ports running in the background. Skype is a perfect example. Exit those applications are restart XAMPP.
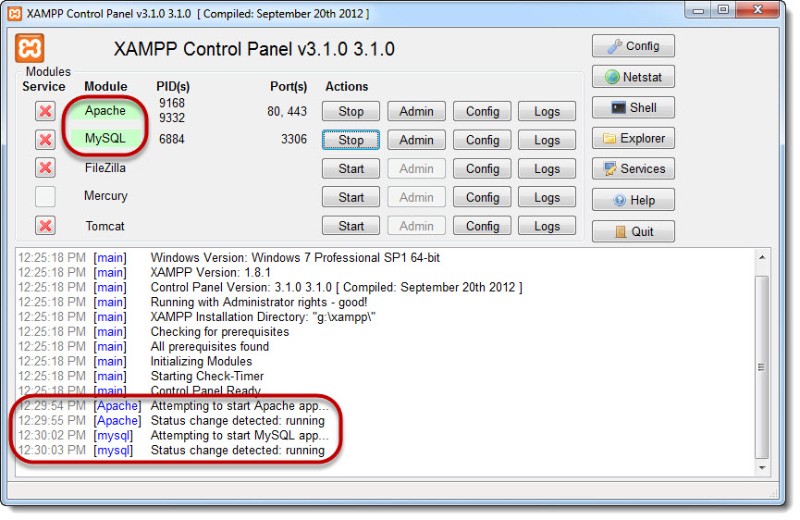
If the installation didn’t run into any errors, the control panel would show black and blue text below the list of the panel’s components (Apache, MySQL etc.). All of the elements have their separate Start/Stop, Admin, Config, and Logs buttons.
Run Apache and MySQL by clicking their Start buttons. If the components started without problems, you would see a green background behind their names. Congratulations! You have successfully installed XAMPP server on your computer.
You are now ready to install WordPress XAMPP local server.
Step Five: Your First Database
With XAMPP up and running, it’s time to teach you how to install WordPress, but before we do that, you will need to create a database first. Open your XAMPP Control Panel and click on the “Admin” button of the MySQL section, which will lead you to the phpMyADmin page.
Alternatively, you can reach this page by typing “http://localhost/phpmyadmin/” (without the quotation marks) into your browser.
Find “Databases” link on the top of the page, and right under it you will find “Create Database”. Enter the desired name and click “Create”.
Step Six: How to install WordPress on XAMPP?
Finally, the juicy part! Straight to the point – download the latest version of WordPress from the platforms official website and extract the zipped file to your desktop (or folder of your choice – but it won’t stay there for long).
Copy the extracted content and paste it into the “htdocs” folder which is in the folder where you have installed XAMPP (default address is: C:/Program Files/XAMPP/htdocs)
Open up your browser and type: http://localhost/wordpress/ in the address bar. A screen will show up, asking you to select a language. Then, after clicking “Continue”, another screen will appear asking you the following information:
- Database Name
- Database Username
- Database Password
- Database Host.
It’s completely fine if you don’t know all the information, that’s why we are here. Bravely click “Let’s go!” button, and type in the following information in the boxes:
- Database Name – Write the name of the database you created in step five
- User Name: root
- Password: Leave this field empty. Delete any default text if needed, and
- Database Host: localhost
- Table Prefix: wp_
Click “Submit”, then “Run the install” button. After a few minutes, you will see the “Site Title” field. Go ahead and enter the title of your first test site.
Under the “Username” and “Password” fields, create yourself an admin account. Make sure you save or memorize what you typed in since you will need this information to log in. Enter a valid e-mail address into “Your E-mail” field.
Last but not least, “Privacy” can be used to hide your site from those nasty search engines. After double checking what you typed in and selected, click “Install WordPress”. If everything works smoothly, a success page will be displayed.
Click the “Log In” button and enter your credentials. That will lead you to the admin dashboard of your WordPress website.
Well done! You now know how to run WordPress locally on your computer.
Ending thoughts on xampp tutorial:
XAMPP offers a simple and easy way for you to set up a local server on your computer and test multiple applications on it. One of those apps is our dear WordPress! We strongly advise using the local copy of your website to test out new and updated plugins and themes.
Sometimes this way you can prevent errors from occurring on your live site.
We hope that this XAMPP tutorial helped you create your own locally hosted WordPress website.

Local (from WPEngine)
Local is a local WordPress development application beloved by nearly 300,000 developers (this is much higher now – just not sure exactly what) around the globe. People love Local because it provides them with a safe place to experiment and develop new sites faster. It also lets developers focus on what’s important—building and launching WordPress sites—rather than spending all their time debugging local environments. One of the most common benefits Local users cite is its intuitive and easy-to-use interface, which makes it possible to publish sites with just a few clicks, easily pull down live sites for offline edits, and sync various dev tools for an overall simplified workflow.
The Undsgn Newsletter
Sign up to stay up to date with the latest news!
(You will be forwarded to our subscribe form hosted by Mailchimp)

Tips to fix the 403 Forbidden Error in WordPress
If you are dealing with the 403 Forbidden error on your WordPress…

WordPress White Screen of Death: How to Fix it
Imagine looking at this – you visit your WordPress website address…

How to add Google Analytics to WordPress: tips and plugins
Installing Google Analytics will give you the traffic statistics you…